Acer H7550ST User Manual - Page 44
Using the inner connector(s
 |
View all Acer H7550ST manuals
Add to My Manuals
Save this manual to your list of manuals |
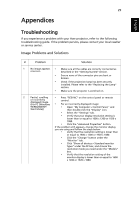
Page 44 highlights
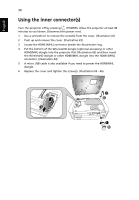
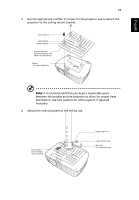
English 34 Using the inner connector(s) Turn the projector off by pressing (POWER). Allow the projector at least 45 minutes to cool down. Disconnect the power cord. 1 Use a screwdriver to remove the screw(s) from the cover. (Illustration #1) 2 Push up and remove the cover. (Illustration #2) 3 Locate the HDMI (MHL) connector beside the focus/zoom ring. 4 Put the bottom of the WirelessHD dongle (optional accessory) or other HDMI/MHL dongle into the projector first (Illustration #3) and then insert the WirelessHD dongle or other HDMI/MHL dongle into the HDMI (MHL) connector. (Illustration #4) 5 A micro USB cable is also available if you need to power the HDMI/MHL dongle. 6 Replace the cover and tighten the screw(s). (Illustration #5 - #6) 4 3 2 3 5 4 1 6
-
 1
1 -
2
-
3
-
4
-
5
-
6
-
7
-
8
-
9
-
10
-
11
-
12
-
13
-
14
-
15
-
16
-
17
-
18
-
19
-
20
-
21
-
22
-
23
-
24
-
25
-
26
-
27
-
28
-
29
-
30
-
31
-
32
-
33
-
34
-
35
-
36
-
37
-
38
-
 39
39 -
 40
40 -
 41
41 -
 42
42 -
 43
43 -
 44
44 -
 45
45 -
 46
46 -
 47
47 -
 48
48 -
 49
49 -
50
-
51
-
52
-
53
-
54
-
55
-
56
-
57
-
58
-
59
 |
 |
