Acer P1360WBi User Manual Media - Page 15
Setting, Software Upgrade Instructions
 |
View all Acer P1360WBi manuals
Add to My Manuals
Save this manual to your list of manuals |
Page 15 highlights
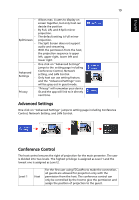
English 15 Setting Menu Item Photo Display Ratio Interval time Video repeat mode Music repeat mode Options Original, Full Screen 3 sec, 5 sec, 10 sec Sequence, Single Sequence, Single Software Upgrade Instructions There are 2 ways to do this: Via USB flash drive (1) Download new firmware by one compressed file from acer global website. (2) Copy the uncompressed file in USB flash drive and plug in projector. "Firmware Upgrade" Select "USB Drive" and press Enter to start. Via Network (1) Connect a Acer WirelessPrejection-Kit dongle (optional) or a RJ45 cable to the projector. (Make sure it connects to the internet.) (2) Press "MENU" to open the OSD menu. (3) Go to "Setting" > "Firmware Upgrade" Select "Network" and press Enter to start. NOTE 1: Do not turn off projector while the firmware upgrade is processing. NOTE 2: When upgrading the firmware, remove all cables and other USB devices. NOTE 3: External USB HDD is probably not supported if connection lacks of USB power (recommend to use Y-cable) since USB power is not enough. NOTE 4: The disk with partition is not supported.
-
 1
1 -
2
-
3
-
4
-
5
-
6
-
7
-
8
-
9
-
 10
10 -
 11
11 -
 12
12 -
 13
13 -
 14
14 -
 15
15 -
 16
16 -
 17
17 -
 18
18 -
 19
19 -
 20
20 -
21
-
22
-
23
-
24
-
25
-
26
-
27
-
28
-
29
-
30
-
31
-
32
-
33
-
34
-
35
-
36
-
37
 |
 |
