Acer Veriton 5200 Veriton 5200 - Page 66
Replacing the hard disk, To recon your computer
 |
View all Acer Veriton 5200 manuals
Add to My Manuals
Save this manual to your list of manuals |
Page 66 highlights
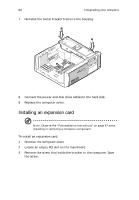
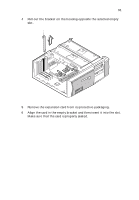
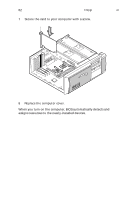
58 4 Upgrading your computer To reconfigure your computer Your computer automatically detects the amount of additional memory installed. Run the BIOS Setup utility to view the new value for total system memory and make a note of it. For more information on BIOS, refer to the Veriton 5200 online guide (see "Accessing your online guide" on page 5). Replacing the hard disk Follow these steps to replace your computer's hard disk: 1 Remove the computer cover. 2 Detach the power and disk drive cables from the hard disk. 3 Remove the screw that secures the metal bracket frame to the housing. 4 Lift up the metal bracket and pull it out.
-
 1
1 -
2
-
3
-
4
-
5
-
6
-
7
-
8
-
9
-
10
-
11
-
12
-
13
-
14
-
15
-
16
-
17
-
18
-
19
-
20
-
21
-
22
-
23
-
24
-
25
-
26
-
27
-
28
-
29
-
30
-
31
-
32
-
33
-
34
-
35
-
36
-
37
-
38
-
39
-
40
-
41
-
42
-
43
-
44
-
45
-
46
-
47
-
48
-
49
-
50
-
51
-
52
-
53
-
54
-
55
-
56
-
57
-
58
-
59
-
60
-
 61
61 -
 62
62 -
 63
63 -
 64
64 -
 65
65 -
 66
66 -
 67
67 -
 68
68 -
 69
69 -
 70
70 -
 71
71 -
72
-
73
-
74
-
75
-
76
-
77
-
78
-
79
-
80
-
81
-
82
-
83
-
84
-
85
-
86
 |
 |

4 Upgrading your computer
58
To reconfigure your computer
Your computer automatically detects the amount of additional
memory installed.
Run the BIOS Setup utility to view the new value for
total system memory and make a note of it.
For more information on
BIOS, refer to the Veriton 5200 online guide (see “Accessing your
online guide” on page 5).
Replacing the hard disk
Follow these steps to replace your computer’s hard disk:
1
Remove the computer cover.
2
Detach the power and disk drive cables from the hard disk.
3
Remove the screw that secures the metal bracket frame to the
housing.
4
Lift up the metal bracket and pull it out.