Adaptec XHub7 Quick Start Guide - Page 10
Stacking Your Hubs
 |
UPC - 760884138472
View all Adaptec XHub7 manuals
Add to My Manuals
Save this manual to your list of manuals |
Page 10 highlights
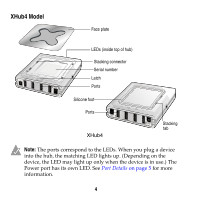
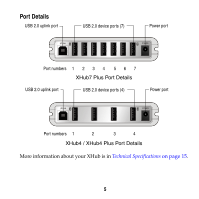
Stacking Your Hubs If you want to add more USB 2.0 ports to your system, Adaptec XHubs can be daisy-chained (linked in series) and stacked together. (See Making the Most of Your Daisy-Chain on page 11 for more information.) Hubs can be piled on a flat surface (such as your desk) or they can be joined together using the built-in connector slots and tabs. To join your hubs using the connector slots and tabs: 1 Remove the face or frame plate, as shown in the picture below. Tab Step 1: Gently pull latch down to release face/frame plate. Step 3: Pull face/frame plate down to remove. Step 2: Pull bottom of face/frame plate out slightly. Removing the Face Plate/Frame Plate 9
-
 1
1 -
2
-
3
-
4
-
 5
5 -
 6
6 -
 7
7 -
 8
8 -
 9
9 -
 10
10 -
 11
11 -
 12
12 -
 13
13 -
 14
14 -
 15
15 -
16
-
17
-
18
-
19
-
20
-
21
-
22
-
23
-
24
-
25
-
26
-
27
-
28
-
29
 |
 |

9
Stacking Your Hubs
If you want to add more USB 2.0 ports to your system, Adaptec XHubs
can be daisy-chained (linked in series) and stacked together. (See
Making
the Most of Your Daisy-Chain
on page 11
for more information.)
Hubs can be piled on a flat surface (such as your desk) or they can be
joined together using the built-in connector slots and tabs.
To join your hubs using the connector slots and tabs:
1
Remove the face or frame plate, as shown in the picture below.
Removing the Face Plate/Frame Plate
Gently pull latch down to
Pull face/frame
plate down to remove.
release face/frame plate.
Step 1:
Step 3:
Step 2:
Pull bottom of
Tab
face/frame plate
out slightly.