Akai MPC500 User Manual - Page 4
MPC500 Quick Start Guide, Basic Information, [MODE] button, Cursor, Cursor buttons, Field, DATA wheel - manual
 |
View all Akai MPC500 manuals
Add to My Manuals
Save this manual to your list of manuals |
Page 4 highlights
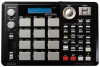
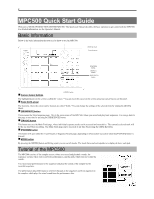
2 MPC500 Quick Start Guide Welcome to MUSIC PRODUCTION CENTER MPC500. This Quickstart Manual describes the basic operation to get started with the MPC500. For detailed information, see the Operator's Manual. Basic Information Below is the basic information that you need to know to use the MPC500. [DATA] wheel Cursor buttons [PARAMS] button [TRACK] button [SEQUENCE] button „ Cursor, Cursor buttons [MODE] button The highlighted part on the screen is called the "cursor." You can move the cursor on the screen using four cursor buttons on the panel. „ Field, DATA wheel The locations, where the cursor can be located, are called "fields." You can change the settings of the selected field, by turning the [DATA] wheel. „ [SEQUENCE] button This accesses the Main Sequence page. This is the main screen of the MPC500, where you record and play back sequences. You can go back to this page at any time by pressing the [SEQUENCE] button. „ [TRACK] button This button accesses the Main Track page, where individual sequence tracks can be accessed and recorded to. The currently selected track will be the one used when recording. The Main Track page can be accessed at any time by pressing the [TRACK] button. „ [PARAMS] button This button will open either the Track Params or Sequence Params page, depending on what section was active when the [PARAMS] button is pressed. „ MODE button By pressing the [MODE] button and hitting a pad, you can switch modes. The mode that a pad corresponds to is displayed above each pad. Tutorial of the MPC500 The MPC500 consists of the sampler section, where you record and playback sounds, the sequencer section, where you record your performances, and the pads, which you use to play the sounds. You record your performances to the sequencer and play the sounds of the sampler by the recorded sequences. The performance data (MIDI data) is sent from the pads to the sequencer and from sequencer to the sampler, which plays the actual sound from the performance data.
-
 1
1 -
 2
2 -
 3
3 -
 4
4 -
 5
5 -
 6
6 -
 7
7 -
 8
8 -
 9
9 -
 10
10 -
11
-
12
-
13
-
14
-
15
-
16
-
17
-
18
-
19
-
20
-
21
-
22
-
23
-
24
-
25
-
26
-
27
-
28
-
29
-
30
-
31
-
32
-
33
-
34
-
35
-
36
-
37
-
38
-
39
-
40
-
41
-
42
-
43
-
44
-
45
-
46
-
47
-
48
-
49
-
50
-
51
-
52
-
53
 |
 |
