Alesis E-Practice Pad Quick Start Guide - Page 7
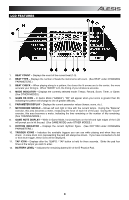
TRAINING MODE, BEAT CHECK, BALANCE, PATTERN, Check, Follow Me, Gradual Up / Down, Count - practice pad
 |
View all Alesis E-Practice Pad manuals
Add to My Manuals
Save this manual to your list of manuals |
Page 7 highlights
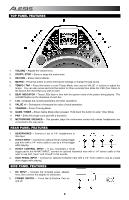
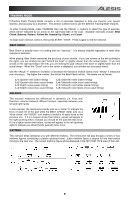
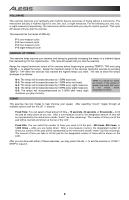
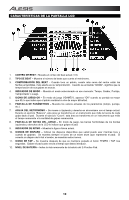
TRAINING MODE E-Practice Pad's Training Mode contains a set of exercises designed to help you improve your speed, stamina, and accuracy as a drummer. This section outlines how to use the different Training Mode features. To enter Training Mode, press TRAINING then use the VALUE +/- buttons to select the type of exercise, which will be indicated by an arrow on the right-hand side of the LCD. Available exercises include: Beat Check, Balance, Pattern, Follow Me, Gradual Up / Down, and Count. To begin each exercise, select it, then press START / STOP. Press it again to end the exercise. BEAT CHECK Beat Check is actually more of a setting than an "exercise." It is always enabled regardless of what other exercise is selected. While playing, Beat Check measures the accuracy of your strokes. If you see arrows on the left (pointing to the right), you are striking the pad "behind the beat" or slightly slower than the actual tempo. If you see arrows on the right (pointing to the left), you are striking the pad "ahead of the beat" or slightly faster than the actual tempo. When the "Good" icon in the center is displayed, your strokes are accurately timed. Use the VALUE +/- buttons to increase or decrease the tolerance of Beat Check (how "strictly" it measures your accuracy). The higher the number, the stricter the Beat Check will be. The levels are as follows: L-1: Quarter note (easier timing) L-2: Quarter note (more exact timing) L-3: Eighth notes (easier timing) L-4: Eighth notes (more exact timing) L-5: Sixteenth notes (easier timing) L-6: Sixteenth notes (more exact timing) L-7: Sixteenth note triplets (easier timing) L-8: Sixteenth note triplets (more exact timing) BALANCE This exercise measures the differences in dynamics (i.e. force and, therefore, volume) between different strokes, especially between your left and right hands. In this exercise, the metronome needle acts as a "meter" to indicate the force of each hit of the pad while the BEAT CHECK meter acts as a "force check": the "GOOD" icon means a stroke is of equal force to the previous one. If it is a heavier stroke than before, arrows will appear to the right (pointing left) to indicate you should hit the pad with less force. If it is a lighter stroke than before, arrows will appear to the left (pointing right) to indicate you should hit the pad with more force. PATTERN This exercise helps familiarize you with different rhythms. The metronome will play through a series of four rhythmic figures constituting a pattern (pictured here). Each rhythmic figure is played for two bars before moving to the next one. The current rhythmic figure will be displayed in the RHYTHM TYPE area of the LCD. 5
-
 1
1 -
 2
2 -
 3
3 -
 4
4 -
 5
5 -
 6
6 -
 7
7 -
 8
8 -
 9
9 -
 10
10 -
 11
11 -
 12
12 -
13
-
14
-
15
-
16
-
17
-
18
-
19
-
20
-
21
-
22
-
23
-
24
 |
 |