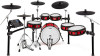
Alesis Strike Pro Special Edition Strike Pro Special Edition - Quickstart Guid - Page 6
Rear Panel - electronic drums
 |
View all Alesis Strike Pro Special Edition manuals
Add to My Manuals
Save this manual to your list of manuals |
Page 6 highlights
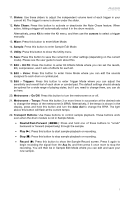
Rear Panel 2 4 1 9 8 12 5 6 3 11 10 7 1. Power Input: Connect the included power adapter (12 V, 2 A, center-positive) to this input. 2. Cable Restraint: You can secure the cable of the power adapter to this restraint to help prevent disconnecting it accidentally. 3. Power Switch: Press this button to power the drum module on or off. Power it on only after you have connected all of your input devices and before you power on any connected loudspeakers. Power off your loudspeakers before powering off the drum module. 4. Trigger Inputs (1/4"/6.35 mm, TRS): Connect these inputs to the triggers of your electronic drum kit. When connected, hitting a trigger will send an electric signal to the drum module, which will trigger the corresponding sound. 5. Aux In (1/8"/3.5 mm, TRS): Connect this input to an optional external audio device (computer, tablet, smartphone, etc.). You can then listen and play long to your favorite backing tracks or record the incoming audio signal in Sample Mode. Turn the Aux In knob on the top panel to adjust the volume level. 6. Main Out (1/4"/6.35 mm, TRS): Connect these outputs to your loudspeakers, audio interface, etc. Turn the Main Vol knob on the top panel to adjust the volume level. 7. Direct Audio Outs (1/4"/6.35 mm, TRS or TS): Connect these outputs to your external mixer, audio interface, etc. The independent audio signals of these triggers will be sent out of these outputs: kick, snare, hi-hat, ride, the left and right channels for all toms, and the left and right channels for the crash cymbals. The signal sent from these outputs is fixed at 0 dB and without any effects applied. 8. MIDI In (5-pin DIN): Connect this input to the MIDI output of an external MIDI device (synthesizer, drum machine, etc.). 9. MIDI Out (5-pin DIN): Connect this output to the MIDI input of an external MIDI device (synthesizer, drum machine, etc.). 10. USB Port: Use a standard USB cable to connect this USB port to an available USB port on your computer. This connection sends and receives MIDI information to and from the computer. 11. SD Card Slot: You can insert a standard SDHC card into this slot (a 16 GB card is already included). You can use samples on an SDHC card in your kits and save your kits to it. The SDHC card must be Class 10, use a FAT32 file system, and have a maximum capacity of 32 GB. 12. Display Contrast: Turn this knob to adjust the contrast of the display. 6
-
 1
1 -
 2
2 -
 3
3 -
 4
4 -
 5
5 -
 6
6 -
 7
7 -
 8
8 -
 9
9 -
 10
10 -
 11
11 -
 12
12 -
13
-
14
-
15
-
16
-
17
-
18
-
19
-
20
-
21
-
22
-
23
-
24
-
25
-
26
-
27
-
28
-
29
-
30
-
31
-
32
-
33
-
34
-
35
-
36
 |
 |
