Alpine 9825 Owners Manual - Page 24
XM Radio Operation Optional - cda won t power on
 |
UPC - 793276711052
View all Alpine 9825 manuals
Add to My Manuals
Save this manual to your list of manuals |
Page 24 highlights
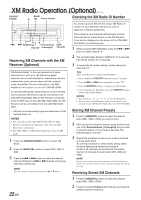
XM Radio Operation (Optional) SOURCE/ POWER BAND/ 8 TEL. Rotary encoder Checking the XM Radio ID Number g f SEARCH 9 Preset buttons DISP/ F/SETUP (1 through 6) TITLE Receiving XM Channels with the XM Receiver (Optional) XM Satellite Radio∗ is the next generation of audio entertainment, with up to 100 brand-new digital channels. For a small monthly fee, subscribers can hear crystal-clear music, sports, news and talk, coast-tocoast via satellite. For more information, visit XM's website at www.xmradio.com or call 1-800-852-9696. An optional XM Satellite Radio Receiver (TUA-T021XM) and an optional XM Antenna may be connected to the CDA-9827/CDA-9825. With an XM Receiver connected to the Ai-NET input of the CDA-9827/CDA-9825, the XM Receiver will be controllable from the CDA-9827/CDA9825. ∗ XM and its corresponding logos are trademarks of XM Satellite Radio Inc. NOTES • The controls on the CDA-9827/CDA-9825 for XM Receiver operation are operative only when an XM Receiver is connected. • The XM1, XM2 or XM3 band illuminates when in XM mode. 1 Press the SOURCE/POWER button to select XM Mode. 2 Press the BAND/TEL. button to select XM1, XM2 or XM3. 3 Press the g or f button to select the desired channel. Holding the g or f buttons will change channels continuously. NOTE You can change Category by pressing the 8 or 9 button. 22-EN You need to provide XM with the unique XM Radio ID number for your XM Radio Receiver in order to subscribe to XM's programming. This number is an 8 character alphanumeric number that is printed on a label directly on the XM Receiver. It can also be displayed on the screen of the CDA-9827/ CDA-9825 in the following way. 1 While receiving XM1/XM2/XM3, press the g or f button to select channel "0." 2 The unit alternately displays "RADIO ID" for 2 seconds, then the ID number for 10 seconds. 3 To cancel the ID number display, set the channel to other than "0." Tips There is another way to display your ID number. 1. Press and hold the F/SETUP button for at least 3 seconds. 2. Press the f or g button repeatedly to select "ID." 3. Press the BAND/TEL. button to display your ID number. 4. After checking your ID number, press the F/SETUP button to return to the normal display. NOTES • You cannot use "O," "S,"" I," or "F" for the ID Number. • You can check your ID number printed on the label on the package of your XM Satellite Radio Receiver (TUA-T021XM). Storing XM Channel Presets 1 Press the BAND/TEL. button to select the desired band (XM1, XM2 or XM3) you want to store. 2 After tuning in the desired channel, press and hold any one of the Preset buttons (1 through 6) that you want to store the station on for at least 2 seconds. The selected station is stored. 3 Repeat the procedure to store up to 5 other channels onto the same band. To use this procedure for other bands, simply select the band desired and repeat the procedure. A total of 18 channels can be stored in the preset memory (6 channels for each band; XM1, XM2 and XM3). NOTE If you store a channel in a preset memory which already has a station, the current channel will be cleared and replaced with the new one. Receiving Stored XM Channels 1 Press the BAND/TEL. button to select the desired band (XM1, XM2 or XM3). 2 Press the channel Preset button that has your desired satellite channel in memory.
-
 1
1 -
2
-
3
-
4
-
5
-
6
-
7
-
8
-
9
-
10
-
11
-
12
-
13
-
14
-
15
-
16
-
17
-
18
-
 19
19 -
 20
20 -
 21
21 -
 22
22 -
 23
23 -
 24
24 -
 25
25 -
 26
26 -
 27
27 -
 28
28 -
 29
29 -
30
-
31
-
32
-
33
-
34
-
35
-
36
-
37
-
38
-
39
-
40
 |
 |
