Alpine HCE-C300R Owners Manual - Page 28
Calibration
 |
UPC - 793276401847
View all Alpine HCE-C300R manuals
Add to My Manuals
Save this manual to your list of manuals |
Page 28 highlights
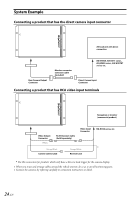
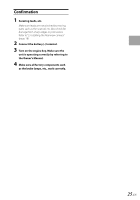
Calibration Introduction What is Calibration? In order to effectively identify approaching objects, it is necessary to configure the guidance and install data. This data is entered during the Calibration mode and ensures the most consistent detection results. Also, the warning message language and the cm/ inch selection can be set in the Calibration mode. • Recalibration is required whenever the camera position is changed or the camera is installed in a different vehicle. • If this camera system is used without being calibrated, or if the calibration sheet is not installed correctly, object detection performance will be degraded. Calibration must be performed. • If the vehicle height changes after calibration, the system must be re-calibrated. • Be sure the shift gear lever is in the P position and apply the hand brake before starting work. • Do not operate the gear lever during calibration. • Always work in a flat location. • When starting the engine, provide adequate ventilation around the car. • Make sure that all connections are securely made. • Do not work in a poorly lit place or in direct sunlight. Setting Flowchart Use the switch to perform calibration. After connecting the camera system with the navigation/monitor, prepare the car body. Set the SETUP switch of the control unit to "OFF." Setting ACC to "ON" activates the system in the normal use mode. Switching between "Calibration Mode" and "Normal Use Mode" HCE-C300R has two modes: "Normal Use Mode" and "Calibration Mode." You can use the SETUP switch on the control unit to switch the mode. If ACC is set to ON with the SETUP switch "ON", the system starts in the calibration mode, and if ACC is set to ON with the SETUP switch "OFF", the system starts in the normal use mode. The factory setting is "OFF". Preparation Accessory parts Calibration sheet A Calibration sheet B External box Interior box Affix the calibration sheet. Set the SETUP switch of the control unit to "ON." Set ACC to "ON". Necessary tools Tape measure Adhesive tape (for positioning mark) Pen (for positioning mark) Perform calibration of the camera. Set ACC to "OFF". 26-EN
-
 1
1 -
2
-
3
-
4
-
5
-
6
-
7
-
8
-
9
-
10
-
11
-
12
-
13
-
14
-
15
-
16
-
17
-
18
-
19
-
20
-
21
-
22
-
 23
23 -
 24
24 -
 25
25 -
 26
26 -
 27
27 -
 28
28 -
 29
29 -
 30
30 -
 31
31 -
 32
32 -
 33
33 -
34
-
35
-
36
-
37
-
38
-
39
 |
 |
