Alpine X409-WRA-JL Owners Manual English - Page 90
About the adjustment of guide display ON/OFF setting and adjustment of Caution display location
 |
View all Alpine X409-WRA-JL manuals
Add to My Manuals
Save this manual to your list of manuals |
Page 90 highlights
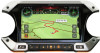
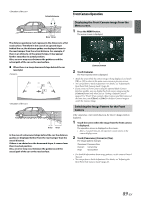
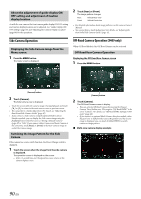
About the adjustment of guide display ON/ OFF setting and adjustment of Caution display location As with the rear camera, the front camera guide display ON/OFF setting and Caution display location can be adjusted. See "Guide Display ON/ OFF Setting" (page 87) and "Adjusting the Caution Display Location" (page 88) for the operations. 2 Touch [Rear] or [Front]. The image pattern changes. Rear: Front: Vehicle Rear view Vehicle Front view • For detailed information about image patterns, see the camera Owner's Manual. • You can perform a Guide Adjustment. For details, see "Adjusting the Rear/Front/Side Camera Guide" (page 45). Side Camera Operation Displaying the Side Camera image from the Menu screen. 1 Press the MENU button. The menu screen is displayed. Off-Road Camera Operation (X409 only) When Off-Road Mode is On, Off-Road Camera can be activated. Off-Road Rear Camera Operation Displaying the Off-Road Rear Camera screen 1 Press the MENU button. [Camera] button 2 Touch [Camera]. The Side Camera view is displayed. • Touch the screen while the camera image is being displayed, and touch [ ] or [ ] to return to the main source screen or previous screen. • You can perform a Guide Adjustment. For details, see "Adjusting the Rear/Front/Side Camera Guide" (page 45). • If you connect a Side Camera using the optional Multi Camera Interface module, you can display the Side camera image using the [Camera] button only when you set "Setting a Default Camera" (page 47) to "Side". If you connect a Rear Camera and Front Camera at the same time, touch [Rear] or [Front] in the Rear Camera image to switch the Camera image. Switching the Image Pattern for the Side Camera If the camera has a view switch function, the Direct Change switch is displayed. 1 Touch the screen when the image from the side camera is displayed. The operation screen is displayed on the screen. • After a 5-second time-out, the operation screen returns to the camera display screen. [Camera] button 2 Touch [Camera]. The Off-Road Camera screen is display. • You can activate Off-Road Camera by pressing the [Source/ Camera View] button once. This requires "Off-Road SWRC" to be set to "Camera". For details, see "Off-Road SWRC Settings (X409 only)" (page 40). • If you connect an optional Multi Camera Interface module, when the gear lever is shifted to the reverse (R) position and the reverse image is displayed, you can touch [CAM]/[VIEW] to switch camera or image pattern. Multi-view camera display example 90-EN
-
 1
1 -
2
-
3
-
4
-
5
-
6
-
7
-
8
-
9
-
10
-
11
-
12
-
13
-
14
-
15
-
16
-
17
-
18
-
19
-
20
-
21
-
22
-
23
-
24
-
25
-
26
-
27
-
28
-
29
-
30
-
31
-
32
-
33
-
34
-
35
-
36
-
37
-
38
-
39
-
40
-
41
-
42
-
43
-
44
-
45
-
46
-
47
-
48
-
49
-
50
-
51
-
52
-
53
-
54
-
55
-
56
-
57
-
58
-
59
-
60
-
61
-
62
-
63
-
64
-
65
-
66
-
67
-
68
-
69
-
70
-
71
-
72
-
73
-
74
-
75
-
76
-
77
-
78
-
79
-
80
-
81
-
82
-
83
-
84
-
 85
85 -
 86
86 -
 87
87 -
 88
88 -
 89
89 -
 90
90 -
 91
91 -
 92
92 -
 93
93 -
 94
94 -
 95
95 -
96
-
97
-
98
-
99
-
100
-
101
-
102
-
103
-
104
-
105
 |
 |
