Amana AGR3311WDW Installation Instruction
Amana AGR3311WDW Manual
 |
UPC - 883049185231
View all Amana AGR3311WDW manuals
Add to My Manuals
Save this manual to your list of manuals |
Amana AGR3311WDW manual content summary:
- Amana AGR3311WDW | Installation Instruction - Page 1
INSTALLATION INSTRUCTIONS 30" (76.2 CM) FREESTANDING GAS RANGES with standard clean oven INSTRUCTIONS D'INSTALLATION DES CUISINIÈRES À GAZ AUTOPORTANTES DE 30" (76,2 CM) avec nettoyage standard du four Table of Contents/Table des matières RANGE SAFETY 2 SÉCURITÉ DE LA CUISINIÈRE 16 - Amana AGR3311WDW | Installation Instruction - Page 2
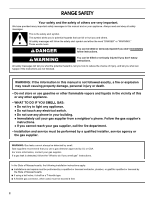
from a neighbor's phone. Follow the gas supplier's instructions. • If you cannot reach your gas supplier, call the fire department. - Installation and service must be performed by a qualified installer, service agency or the gas supplier. WARNING: Gas leaks cannot always be detected by smell - Amana AGR3311WDW | Installation Instruction - Page 3
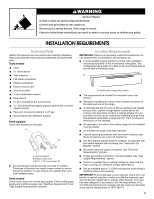
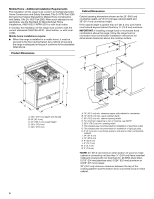
-tip bracket to rear range foot. Reconnect the anti-tip bracket, if the range is moved. Failure to follow these instructions can result in death or serious burns to children and adults. INSTALLATION REQUIREMENTS Tools and Parts Gather the required tools and parts before starting installation. Read - Amana AGR3311WDW | Installation Instruction - Page 4
is greater than 24" (61.0 cm), oven frame must extend beyond cabinet fronts by ½" (13.0 mm) minimum. IMPORTANT: If installing a range hood or microwave hood combination above the range, follow the range hood or microwave hood combination installation instructions for dimensional clearances above the - Amana AGR3311WDW | Installation Instruction - Page 5
the manufacturer's instructions. Type of Gas Natural gas: This range is design-certified by CSA International for use with Natural gas or, after proper conversion, for use with LP gas. ■ This range is factory set for use with Natural gas. See "Gas Conversions" section. The model/serial rating plate - Amana AGR3311WDW | Installation Instruction - Page 6
model/serial rating plate. Line pressure testing above ½ psi gauge (14" WCP) The range and its individual shutoff valve must be disconnected from the gas The range must be isolated from the gas supply piping system by closing its individual manual shutoff valve during any pressure testing of the gas - Amana AGR3311WDW | Installation Instruction - Page 7
under range. 3. Remove oven racks and parts package from inside oven. 4. To place range on its back, take 4 cardboard corners from the carton. Stack one cardboard corner on top of another. Repeat with the other 2 corners. Place them lengthwise on the floor behind the range to support the range when - Amana AGR3311WDW | Installation Instruction - Page 8
in the "Location Requirements" section. 12. Continue installing your range using the following installation instructions. Typical rigid pipe connection A combination of pipe fittings must be used to connect the range to the existing gas line. Your connections may be different, according to the - Amana AGR3311WDW | Installation Instruction - Page 9
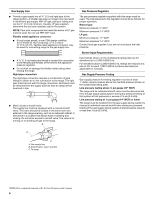
cord. Failure to follow these instructions can result in death, fire, Range 1. Place rack in oven. 2. Place level on rack and check levelness of range, first side to side; then front to back. Front View Front Side View Shutoff valve "ON" Position 3. Open the manual shutoff valve in the gas - Amana AGR3311WDW | Installation Instruction - Page 10
. This sparking continues until the control knob is turned to the desired setting. When the oven control is turned to the desired setting, a hot surface igniter heats to a bright orange and ignites the gas. No sparking occurs. The glow bar remains on while the burner operates. 1. With the burner - Amana AGR3311WDW | Installation Instruction - Page 11
Care Guide for specific instruction on range operation. If range does not operate, check the following: ■ Household fuse is intact and tight, or circuit breaker has not tripped. ■ Range is plugged into a grounded 3 prong outlet. ■ Electrical supply is connected. ■ See the "Troubleshooting" section - Amana AGR3311WDW | Installation Instruction - Page 12
is moved. Failure to follow these instructions can result in death or serious burns to children and adults. To Convert Gas Pressure Regulator 1. Turn manual shutoff valve to the "closed" position. B A C A. To range B. Manual shutoff valve "closed" position C. Gas supply line 12 6. Reinstall the cap - Amana AGR3311WDW | Installation Instruction - Page 13
Spud B. Holder NOTE: Depending on model, the range cooktop may be equipped with 4 standard burners or 3 standard burners and 1 super burner. Spud size and location remain the same. For models with 4 standard burners: A B A. Oven burner B. Air shutter 3. Locate LP gas orifice spud stamped "56" in - Amana AGR3311WDW | Installation Instruction - Page 14
to follow these instructions can result in death or serious burns to children and adults. To Convert Gas Pressure Regulator 1. Turn manual shutoff valve to the "closed" position. B A C A. To range B. Manual shutoff valve "closed" position C. Gas supply line 2. Unplug range or disconnect power - Amana AGR3311WDW | Installation Instruction - Page 15
oven racks, oven tray and flame spreader. Complete Conversion 1. Refer to the "Make Gas Connection" section for properly connecting the range to the gas supply. 2. Turn the manual shutoff valve in the gas supply line to the open position. 3. Refer to "Check Operation" in the "Electronic Ignition - Amana AGR3311WDW | Installation Instruction - Page 16
et ce qui peut se produire en cas de non-respect des instructions. AVERTISSEMENT : Si les renseignements dans ce manuel ne sont pas exactement entretien doivent être effectués par un installateur qualifié, une agence de service ou le fournisseur de gaz. AVERTISSEMENT : L'odorat ne permet pas - Amana AGR3311WDW | Installation Instruction - Page 17
pied arrière de la cuisinière. Joindre de nouveau la bride antibasculement si la cuisinière est déplacée. Le non-respect de ces instructions peut causer un décès ou des brûlures graves aux enfants et aux adultes. EXIGENCES D'INSTALLATION Outillage et composants Rassembler les outils et composants - Amana AGR3311WDW | Installation Instruction - Page 18
24 CFR, Part 3280 (anciennement Federal Standard for Mobile Home Construction and Safety, Title 24, HUD Part 280). Lorsque d'un ensemble hotte/micro-ondes au-dessus de la cuisinière, suivre les instructions fournies avec la hotte concernant les dimensions de dégagement à respecter au-dessus de - Amana AGR3311WDW | Installation Instruction - Page 19
des placards supérieurs : 13" (33,0 cm) C. Largeur minimale de l'ouverture 30" (76,2 cm) D. Pour la distance libre minimale vers la partie supérieure de . Ne pas utiliser un câble de rallonge. Le non-respect de ces instructions peut causer un décès, un incendie ou un choc électrique. IMPORTANT : La - Amana AGR3311WDW | Installation Instruction - Page 20
la plus récente édition du code national en vigueur : National Fuel Gas Code ANSI Z223.1 (American National Standard), ou CAN/CGA B149 (é tests de fuite de la cuisinière doivent être effectués selon les instructions du fabricant. Canalisation de gaz ■ Installer une canalisation de gaz rigide de - Amana AGR3311WDW | Installation Instruction - Page 21
personnes pour déplacer et installer la cuisinière. Le non-respect de cette instruction peut causer une blessure au dos ou d'autre blessure. 1. Ne pas se dans le sens de la longueur derrière la cuisinière à titre de support de la cuisinière lorsque celle-ci est placée sur sa partie postérieure - Amana AGR3311WDW | Installation Instruction - Page 22
au pied arrière de la cuisinière. Joindre de nouveau la bride antibasculement si la cuisinière est déplacée. Le non-respect de ces instructions peut causer un décès ou des brûlures graves aux enfants et aux adultes. Contacter un installateur de revêtements de sol qualifié pour connaître - Amana AGR3311WDW | Installation Instruction - Page 23
personnel autorisé de chauffage, le personnel autorisé d'une compagnie de gaz, et le personnel d'entretien autorisé. Le non-respect de ces instructions peut causer un décès, une explosion ou un incendie. Raccordement typique à une canalisation rigide On doit utiliser une combinaison de raccords pour - Amana AGR3311WDW | Installation Instruction - Page 24
pas enlever la broche de liaison à la terre. Ne pas utiliser un adaptateur. Ne pas utiliser un câble de rallonge. Le non-respect de ces instructions peut causer un décès, un incendie ou un choc électrique. 7. Brancher sur une prise à 3 alvéoles reliée à la terre. 24 - Amana AGR3311WDW | Installation Instruction - Page 25
gril 1. Ouvrir la porte du gril. 2. Enfoncer et tourner le bouton de commande du four à 350°F. OFF 140 170 200 250 300 350 400 450 OVEN TEMP BROIL 350 ■ La veilleuse du four grandit et la flamme chauffe une petite ampoule métallique. ■ Le brûleur du four doit s'allumer en 20 - Amana AGR3311WDW | Installation Instruction - Page 26
surface et le four. Pour des instructions spécifiques concernant l'utilisation de la cuisinière, consulter le Guide d'utilisation et d'entretien. Si la avez besoin d'assistance ou de service : Veuillez consulter la section "Assistance ou service" dans le Guide d'utilisation et d'entretien ou - Amana AGR3311WDW | Installation Instruction - Page 27
au pied arrière de la cuisinière. Joindre de nouveau la bride antibasculement si la cuisinière est déplacée. Le non-respect de ces instructions peut causer un décès ou des brûlures graves aux enfants et aux adultes. Conversion du détendeur 1. Placer le robinet d'arrêt manuel à la position "ferm - Amana AGR3311WDW | Installation Instruction - Page 28
gaz propane à l'aide d'une clé mixte de 7 mm. A A. Capuchon 5. Faire pivoter le capuchon de façon à ce que la mention "LP" soit visible. A B A. Gicleur B. Support REMARQUE : Selon le modèle, la table de cuisson de cuisinière peut être équipée de 4 brûleurs standard ou de 3 brûleurs standard et - Amana AGR3311WDW | Installation Instruction - Page 29
au pied arrière de la cuisinière. Joindre de nouveau la bride antibasculement si la cuisinière est déplacée. Le non-respect de ces instructions peut causer un décès ou des brûlures graves aux enfants et aux adultes. A A. Gicleur pour gaz propane portant la mention "56". 6. Placer le brûleur - Amana AGR3311WDW | Installation Instruction - Page 30
A A. Capuchon 5. Retourner le capuchon de façon à ce que la mention "N" ou "NAT" soit visible. A B A. Gicleur B. Support REMARQUE : Selon le modèle, la table de cuisson de cuisinière peut être équipée de 4 brûleurs standard ou de 3 br ûleurs, les chapeaux de brûleurs et les grilles de brûleurs. 30 - Amana AGR3311WDW | Installation Instruction - Page 31
Conversion du brûleur du four 1. Ouvrir la porte du four et retirer les grilles du four, la plaque du four ainsi que le répartiteur de flammes et les mettre de côté. 2. Soulever le brûleur du four. Le gicleur se trouve derrière la virole de réglage d'admission d'air du brûleur du four. A B A. Brû - Amana AGR3311WDW | Installation Instruction - Page 32
W10325589A © 2010. All rights reserved. Tous droits réservés. 6/10 Printed in Mexico. Imprimé au Mexique.
-
 1
1 -
 2
2 -
 3
3 -
 4
4 -
 5
5 -
 6
6 -
 7
7 -
8
-
9
-
10
-
11
-
12
-
13
-
14
-
15
-
16
-
17
-
18
-
19
-
20
-
21
-
22
-
23
-
24
-
25
-
26
-
27
-
28
-
29
-
30
-
31
-
32
 |
 |

INSTALLATION INSTRUCTIONS
30" (76.2 CM) FREESTANDING GAS RANGES
with standard clean oven
INSTRUCTIONS D’INSTALLATION DES CUISINIÈRES À GAZ
AUTOPORTANTES DE 30" (76,2 CM)
avec nettoyage standard du four
Table of Contents/Table des matières
RANGE SAFETY
.............................................................................
2
INSTALLATION REQUIREMENTS
...............................................
3
Tools and Parts
............................................................................
3
Location Requirements
...............................................................
3
Electrical Requirements
...............................................................
5
Gas Supply Requirements
...........................................................
5
INSTALLATION INSTRUCTIONS
.................................................
7
Unpack Range
.............................................................................
7
Install Anti-Tip Bracket
................................................................
7
Make Gas Connection
.................................................................
8
Verify Anti-Tip Bracket Location
..................................................
9
Level Range
.................................................................................
9
Electronic Ignition System
.........................................................
10
Complete Installation
.................................................................
11
GAS CONVERSIONS
...................................................................
12
LP Gas Conversion
....................................................................
12
Complete Conversion
................................................................
14
Natural Gas Conversion
............................................................
14
Complete Conversion
................................................................
15
SÉCURITÉ DE LA CUISINIÈRE
...................................................
16
EXIGENCES D’INSTALLATION
...................................................
17
Outillage et composants
............................................................
17
Exigences d'emplacement
.........................................................
18
Spécifications électriques
..........................................................
19
Spécifications de l’alimentation en gaz
.....................................
20
INSTRUCTIONS D’INSTALLATION
............................................
21
Déballage de la cuisinière
..........................................................
21
Installation de la bride antibasculement
....................................
22
Raccordement au gaz
................................................................
23
Vérification de l'emplacement de la bride
antibasculement
.........................................................................
24
Réglage de l'aplomb de la cuisinière
.........................................
24
Système d'allumage électronique
.............................................
25
Achever l’installation
..................................................................
26
CONVERSIONS POUR CHANGEMENT DE GAZ
......................
27
Conversion pour l'alimentation au propane
..............................
27
Terminer la conversion
...............................................................
29
Conversion pour l'alimentation au gaz naturel
..........................
29
Terminer la conversion
...............................................................
31
IMPORTANT:
Installer:
Leave installation instructions with the homeowner.
Homeowner:
Keep installation instructions for future reference.
IMPORTANT :
Installateur :
Remettre les instructions d'installation au propriétaire.
Propriétaire :
Conserver les instructions d'installation pour référence ultérieure.
W10325589A