Archos 501582 User Manual - Page 5
Settings, Wireless & networks, Wi-Fi, Wi-Fi settings, Connect, Add a Wi-Fi network, Regulatory - tablet
 |
View all Archos 501582 manuals
Add to My Manuals
Save this manual to your list of manuals |
Page 5 highlights
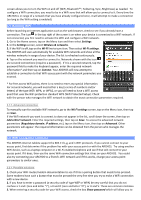
screen allows you to turn the WiFi on and off (WiFi, Bluetooth®*, Tethering, Sync, Brightness) as needed. To configure a WiFi connection, you need to be in a WiFi zone that will allow you to connect to it. Every time the ARCHOS is in range of a network that you have already configured once, it will attempt to make a connection (so long as the WiFi setting is enabled). 3.1. Enabling WiFi Before launching an Internet application such as the web browser, check to see if you already have a connection. The icon in the top right of the screen is on when your device is connected to a WiFi network. If not connected, you first need to activate the WiFi and configure a WiFi network. 1. Go to the Home screen, tap on the Menu icon and then select Settings. 2. In the Settings screen, select Wireless & networks. 3. If the WiFi is off, tap on the Wi-Fi line to turn it on. Then select Wi-Fi settings. The ARCHOS will scan automatically for available WiFi networks and show all the wireless networks in range of your device. The list is refreshed continuously. 4. Tap on the network you want to connect to. Networks shown with the icon are secured connections (requires a password). If it is a secured network, tap the password field to make the keyboard appear, enter the required network information* and then tap on Connect. Your ARCHOS will now attempt to establish a connection to that WiFi access point with the network parameters you entered. * For free access WiFi points, there is no need to enter any special information. For secured networks, you will need either a key (a series of numbers and/or letters) of the type WEP, WPA, or WPA2, or you will need to have a WiFi access point that uses the WiFi protection standard WPS (WiFi Protected Setup). Check with the person who manages the WiFi network to obtain the exact connection parameters required. 3.1.1. Advanced connection To manually scan for available WiFi networks, go to the Wi-Fi settings screen, tap on the Menu icon, then tap on Scan. If the WiFi network you want to connect to does not appear in the list, scroll down the screen, then tap on Add a Wi-Fi network. Enter the required settings, then tap on Save. To access the advanced network parameters (Regulatory domain, IP address, etc), tap on the Menu icon, then tap on Advanced. Other parameters will appear: the required information can be obtained from the person who manages the network. 3.2. WiFi connection problems The ARCHOS internet tablets support the 802.11 b, g, and n WiFi protocols. If you cannot connect to your access point, first determine if the problem lies with your access point or with the ARCHOS. Try using another WiFi device, such as a laptop computer or a Wi-Fi enabled telephone and see if that will connect to your access point. If it does, then use the same WiFi connection settings that it has on your ARCHOS. You could also try connecting your ARCHOS to a friend's WiFi network and if this works, change your access point parameters to similar ones. 3.2.1. Possible solutions 1. Check your WiFi router/modem documentation to see if it has a pairing button that needs to be pressed. Some modems have such a button that must be pressed the very first time you try to make a WiFi connection with a new device. 2. If you have to enter a password (a security code of type WEP or WPA) be very careful that you do not confuse a 1 and I (one and letter "I"), a 0 and O (zero and letter "O"), or U and V. These are common mistakes. 3. When entering a security code for your WiFi access, check the box Show password which will allow you to
-
 1
1 -
 2
2 -
 3
3 -
 4
4 -
 5
5 -
 6
6 -
 7
7 -
 8
8 -
 9
9 -
 10
10 -
 11
11 -
12
-
13
-
14
-
15
-
16
-
17
-
18
-
19
-
20
-
21
-
22
-
23
 |
 |
