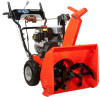
Ariens Compact 22 Owners Manual - Page 9
Install Headlight, Install Discharge Chute - gearing
 |
View all Ariens Compact 22 manuals
Add to My Manuals
Save this manual to your list of manuals |
Page 9 highlights
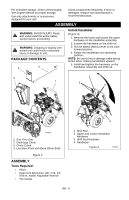
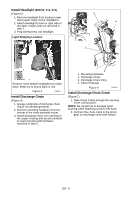
Install Headlight (920012, 014, 015) (Figure 5) 1. Remove headlight from location under dash panel. Keep nut for installation. 2. Attach headlight to bolt on right side of the dash. Fasten with nut removed in step 1. 3. Plug wireharness into headlight. . Light Shipping Location 2 4 1 3 Remove nut to detach headlight from under dash. Keep nut to mount light on unit. Figure 5 OS8045 Install Discharge Chute (Figure 6) 1. Grease underside of discharge chute ring (if not already greased). 2. Remove mounting hardware from the bottom of the chute pedestal mount. 3. Install discharge chute over opening in the auger housing and secure pedestal to auger housing with hardware removed in step 2. 1 1. Mounting Hardware 2. Discharge Chute 3. Discharge Chute Ring 4. Chute Pedestal Figure 6 OS8050 Install Discharge Chute Crank (Figure 7) 1. Slide Chute Crank through the opening in the control panel. NOTE: Be careful not to damage nylon bushing when attaching crank to the dash. 2. Connect the chute crank to the pinion gear on discharge chute with hairpin. GB - 9
-
 1
1 -
2
-
3
-
 4
4 -
 5
5 -
 6
6 -
 7
7 -
 8
8 -
 9
9 -
 10
10 -
 11
11 -
 12
12 -
 13
13 -
 14
14 -
15
-
16
-
17
-
18
-
19
-
20
-
21
-
22
-
23
-
24
-
25
-
26
-
27
-
28
-
29
-
30
-
31
-
32
-
33
-
34
-
35
-
36
-
37
-
38
 |
 |
