Asko D5436XLS Use and Care Guide EN - Page 12
Care and maintenance, instructions
 |
View all Asko D5436XLS manuals
Add to My Manuals
Save this manual to your list of manuals |
Page 12 highlights
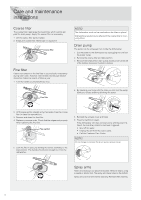
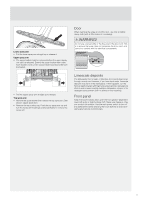
Care and maintenance instructions Coarse filter The coarse filter traps larger food particles, which cannot get past the drain pump. Empty the coarse filter as necessary. 1 Lift the coarse filter by the handle. 2 Empty the coarse filter. Remember to replace it! Coarse filter Fine filter Debris that collects on the fine filter is automatically rinsed away during each wash. However, the fine filter and its pipe section should be cleaned a couple of times a year. 1 Turn the handle counterclockwise once. NOTE! The dishwasher must not be used without the filters in place! Dishwashing results may be affected if the coarse filter is incorrectly fitted. Drain pump The pump can be accessed from inside the dishwasher. 1 Cut the power to the dishwasher by unplugging the unit from the power outlet. 2 Remove the coarse filter and pipe section. 3 Remove the small yellow drain pump access cover at the left of the bottom drain (see illustration below). Fine filter 1x 4 By inserting your finger into the hole, you can turn the pump blades to release anything blocking the pump. 2 Lift the pipe section straight up by the handle. Free the coarse filter to clean the pipe section. 3 Remove and clean the fine filter. 4 Replace in reverse order. Check that the edges seal properly when replacing the fine filter. Pipe section 5 Lock the filter in place by turning the handle clockwise to the stop position. The handle should point straight out from the dishwasher. 5 Reinstall the access cover and filters. 6 Plug the machine in again. If the dishwasher still does not start and a whirring sound is heard, the overflow protection has been triggered. • Shut off the water. • Unplug the unit from the power outlet. • Call the Customer Care Center. NOTE! Do not forget to reinstall the drain pump access cover. Spray arms Holes and bearings can become blocked. Remove debris using a needle or similar item. The spray arms have holes on the bottom. 1x Spray arms can be removed for cleaning. Reinstall after cleaning. 12
-
 1
1 -
2
-
3
-
4
-
5
-
6
-
 7
7 -
 8
8 -
 9
9 -
 10
10 -
 11
11 -
 12
12 -
 13
13 -
 14
14 -
 15
15 -
 16
16 -
 17
17 -
18
-
19
-
20
 |
 |
