Asko DC7171 User manual Use & Care Guide ASKO DC7171 EN - Page 16
Mounting into custom, cabinetry
 |
View all Asko DC7171 manuals
Add to My Manuals
Save this manual to your list of manuals |
Page 16 highlights
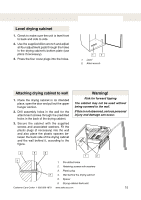
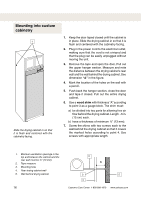
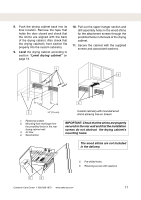
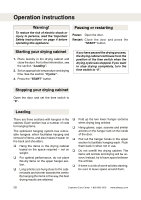
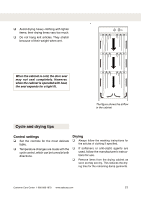
Mounting into custom cabinetry 1 Slide the drying cabinet in so that it is flush and centered with the cabinetry facing. 1. Keep the door taped closed until the cabinet is in place. Slide the drying cabinet in so that it is flush and centered with the cabinetry facing. 2. Plug in the power cord to the electrical outlet, making sure that the cord is not crimped and that the plug can be easily unplugged without moving the unit. 3. Remove the tape and open the door. Pull out the upper hanger section. Measure and note the distance between the drying cabinet's rear wall and the wall behind the drying cabinet. See dimension "A" in the figure. 4. Mark the location of the holes on the wall with a pencil. 5. Push back the hanger section, close the door and tape it closed. Pull out the entire drying cabinet. 6. Use a wood shim with thickness "A" according to point 3 as a gauge block. The shim must: a) be divided into two parts for allowing free air flow behind the drying cabinet. Length ~6 in. (15 cm) each. b) have a thickness of minimum ½" (13 mm). 7. Screw the shims with two screws each to the wall behind the drying cabinet so that it covers the marked holes according to point 4. Use screws with appropriate length. 1. Minimum ventilation openings in the top and between the cabinet and the rear wall must be ½" (13 mm). 2. Tape measure 3. Mounting hole 4. Rear drying cabinet wall 5. Wall behind drying cabinet 16 2 A 3 5 4 Customer Care Center 1-800-898-1879 www.askousa.com
-
 1
1 -
2
-
3
-
4
-
5
-
6
-
7
-
8
-
9
-
10
-
 11
11 -
 12
12 -
 13
13 -
 14
14 -
 15
15 -
 16
16 -
 17
17 -
 18
18 -
 19
19 -
 20
20 -
 21
21 -
22
-
23
-
24
-
25
-
26
-
27
-
28
-
29
-
30
-
31
-
32
 |
 |
