Asko DC7171 User manual Use & Care Guide ASKO DC7171 EN - Page 20
Operation instructions - appliances
 |
View all Asko DC7171 manuals
Add to My Manuals
Save this manual to your list of manuals |
Page 20 highlights
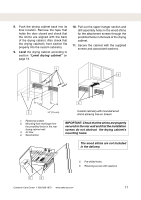
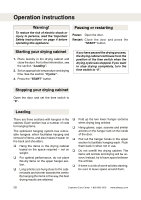
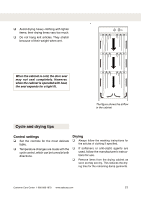
Operation instructions Warning! To reduce the risk of electric shock or injury to persons, read the 'Important Safety Instructions' on page 4 before operating this appliance. Pausing or restarting Pause: Open the door. Restart: Close the door and press the "START" button. Starting your drying cabinet 1. Place laundry in the drying cabinet and close the door. For further information, see the section "Loading". 2. Set an appropriate temperature and drying time. See the section "Cycles". 3. Press the "START" button. If you have paused the drying process, the drying cabinet continues from the position of the time switch when the drying cycle was stopped. If you want to stop drying completely, turn the time switch to "0". Stopping your drying cabinet Open the door and set the time switch to "0". Loading There are three sections with hangers in the Fold up the two lower hanger sections cabinet. Each section has a number of rods when drying long articles. for hanging items. Hang gloves, caps, scarves and similar The optimized hanging system has remov- articles on the hanger rack on the inside able hangers, which facilitates hanging and of the door. removal of items, and also makes it easier on Pull out the hanger hooks in the upper the back and shoulders. section to facilitate hanging wash. Push Hang the items in the drying cabinet them back in when not in use. based on the space required - not on Do not overfill the drying cabinet. The weight. items will wrinkle and drying will be un- For optimal performance, do not place even. Instead, try to leave space between flat-dry items on the upper hanger sec- the articles. tion. If there is a risk of some articles staining, Long articles are hung close to the cabi- be sure to leave space around them. net walls and shorter towards the center. By hanging the items in this way, the best drying results are attained. 20 Customer Care Center 1-800-898-1879 www.askousa.com
-
 1
1 -
2
-
3
-
4
-
5
-
6
-
7
-
8
-
9
-
10
-
11
-
12
-
13
-
14
-
 15
15 -
 16
16 -
 17
17 -
 18
18 -
 19
19 -
 20
20 -
 21
21 -
 22
22 -
 23
23 -
 24
24 -
 25
25 -
26
-
27
-
28
-
29
-
30
-
31
-
32
 |
 |