Asko T761 User manual Use & Care Guide Asko T701,721,761,781 - Page 8
Reversing The Door Hinges
 |
View all Asko T761 manuals
Add to My Manuals
Save this manual to your list of manuals |
Page 8 highlights
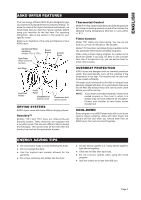
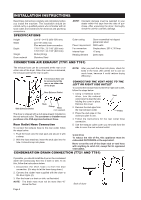
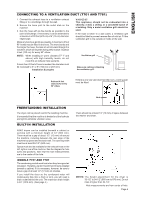
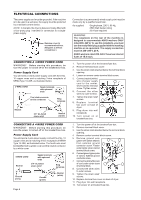
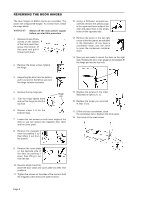
REVERSING THE DOOR HINGES The door hinges on ASKO dryers are reversible. The dryers are shipped left-hinged. To reverse them, follow the steps below: WARNING! Switch off the main power supply before you start this procedure. 1. Remove the two 20 torx screws on the bottom of the front panel then grasp the bottom of the panel and pull it forward and down. 2. Remove the three screws holding the hinge. 12. Using a flathead screwdriver, carefully remove the plastic plugs in the upper and lower edge of the door and place them in the empty holes on the opposite side. 13. Remove the screw in the top right corner of the front panel, as indicated in the illustration. (If you have a condenser dryer, you will need to open the condenser container door.) 14. Now you are ready to mount the door on the right side. Holding the door at an angle (as illustrated), fit the hinge pin into the top hole. 3. Supporting the door from the bottom, pull it out and to the left as you turn the hinge counter clockwise. 4. Remove the top hinge pin. 5. Turn the hinge upside down and put the hinge pin into the top hole. Hinge pin 6. Repeat steps 2-5 for the bottom hinge. 7. Loosen the two screws on both outer edges of the door so you can remove the magnetic door catch and the cover plate. 8. Remove the magnetic catch by pushing it up then lifting it out from the bottom. 15. Replace the screws in the order illustrated at right (a, b, c). 16. Replace the screw you removed in step 13 (d). 17. (If the unit has a condenser, close the condenser door.) Replace the front panel. 18. Turn back on the main power. 9. Remove the cover plate on the opposite side of the door by pushing it down then lifting it out from the top. 10. Reverse steps 8 and 9 to place the door catch and cover plate into their new positions. 11. Tighten the screws on the sides of the doors to hold the magnetic catch and cover plate in place. Page 8
-
 1
1 -
2
-
 3
3 -
 4
4 -
 5
5 -
 6
6 -
 7
7 -
 8
8 -
 9
9 -
 10
10 -
 11
11 -
 12
12 -
 13
13 -
14
-
15
-
16
-
17
-
18
-
19
-
20
-
21
-
22
-
23
-
24
-
25
-
26
-
27
-
28
-
29
-
30
-
31
-
32
-
33
-
34
-
35
-
36
-
37
-
38
-
39
-
40
-
41
-
42
-
43
-
44
-
45
-
46
-
47
-
48
-
49
-
50
-
51
-
52
-
53
-
54
-
55
-
56
-
57
-
58
-
59
-
60
-
61
-
62
-
63
-
64
-
65
-
66
-
67
-
68
-
69
-
70
-
71
-
72
 |
 |
