Asus A7V400-MX Motherboard DIY Troubleshooting Guide - Page 35
Updating the BIOS using a bootable floppy disk - cannot boot to bios
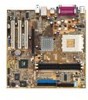 |
View all Asus A7V400-MX manuals
Add to My Manuals
Save this manual to your list of manuals |
Page 35 highlights
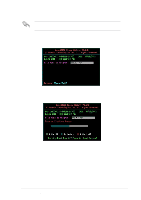
Save only the updated BIOS file in the floppy disk to avoid loading a wrong BIOS file. 3. Reboot the computer. 4. Press + during POST to display the following screen. AWDFLASH checks the new BIOS file on the floppy disk. 5. After verification, AWDFLASH flashes the new BIOS file. Do not shut down the computer during the flash process. The computer returns to POST after the new BIOS file is copied. Updating the BIOS using a bootable floppy disk 1. Boot from the floppy disk. 2. At the "A:\" prompt, type "C:\" and then press . 3. At the "C:\" prompt, type "AWDFLASH BIOSFILENAME" and then . For example: "AWDFLASH aw0702.bin" The AWDFLASH screen appears. 4. Follow steps 4 to 5 of the previous section. ASUS A7V400-MX motherboard user guide 2-3
-
 1
1 -
2
-
3
-
4
-
5
-
6
-
7
-
8
-
9
-
10
-
11
-
12
-
13
-
14
-
15
-
16
-
17
-
18
-
19
-
20
-
21
-
22
-
23
-
24
-
25
-
26
-
27
-
28
-
29
-
 30
30 -
 31
31 -
 32
32 -
 33
33 -
 34
34 -
 35
35 -
 36
36 -
 37
37 -
 38
38 -
 39
39 -
 40
40 -
41
-
42
-
43
-
44
-
45
-
46
-
47
-
48
-
49
-
50
-
51
-
52
-
53
-
54
-
55
-
56
-
57
-
58
-
59
-
60
-
61
-
62
-
63
-
64
 |
 |

ASUS A7V400-MX motherboard user guide
2-3
5.
After verification, AWDFLASH flashes the new BIOS file. Do not shut down the
computer during the flash process. The computer returns to POST after the
new BIOS file is copied.
Save only the updated BIOS file in the floppy disk to avoid loading a wrong
BIOS file.
3.
Reboot the computer.
4.
Press <Alt> + <F2> during POST to display the following screen. AWDFLASH
checks the new BIOS file on the floppy disk.
Updating the BIOS using a bootable floppy disk
1.
Boot from the floppy disk.
2.
At the “A:\” prompt, type “C:\” and then press <Enter>.
3.
At the “C:\” prompt, type “AWDFLASH BIOSFILENAME” and then <Enter>.
For example: “AWDFLASH aw0702.bin” The AWDFLASH screen appears.
4.
Follow steps 4 to 5 of the previous section.