Asus AP120-E1 User Guide - Page 43
washers on both sides of
 |
View all Asus AP120-E1 manuals
Add to My Manuals
Save this manual to your list of manuals |
Page 43 highlights
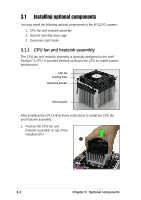
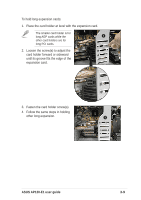
4 5 4. Secure the retention base with a screw. 5. Turn the system upright. To install a Serial ATA hard disk drive: 1 2 Screw holes 1. Insert a HDD to the lower bay of the drive cage. Make sure that the HDD screw holes are aligned with the drive cage screw holes (with black rubber stoppers). 2. Secure the HDD to the cage with two screws (with metal washers) on both sides of the cage. DO NOT install a hard disk drive to the upper bay of the cage. ASUS AP120-E1 user guide 3-5
-
 1
1 -
2
-
3
-
4
-
5
-
6
-
7
-
8
-
9
-
10
-
11
-
12
-
13
-
14
-
15
-
16
-
17
-
18
-
19
-
20
-
21
-
22
-
23
-
24
-
25
-
26
-
27
-
28
-
29
-
30
-
31
-
32
-
33
-
34
-
35
-
36
-
37
-
 38
38 -
 39
39 -
 40
40 -
 41
41 -
 42
42 -
 43
43 -
 44
44 -
 45
45 -
 46
46 -
 47
47 -
 48
48 -
49
-
50
-
51
-
52
 |
 |

3-5
ASUS AP120-E1 user guide
4.
Secure the retention base with
a screw.
5.
Turn the system upright.
To install a Serial ATA hard disk drive:
2.
Secure the HDD to the cage
with two screws (with metal
washers) on both sides of the
cage.
1.
Insert a HDD to the lower bay
of the drive cage. Make sure
that the HDD screw holes are
aligned with the drive cage
screw holes (with black rubber
stoppers).
Screw holes
4
5
1
2
DO NOT
install a hard disk drive to the upper bay of the cage.