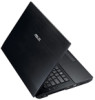
Asus B43V User's Manual for English Edition - Page 23
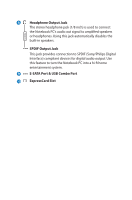
E-SATA Port & USB Combo Port, Optical Drive, Optical Drive Activity Indicator
 |
View all Asus B43V manuals
Add to My Manuals
Save this manual to your list of manuals |
Page 23 highlights
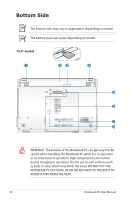
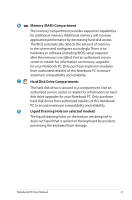
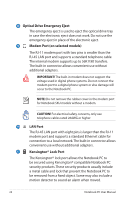
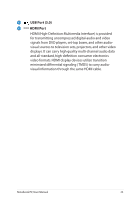
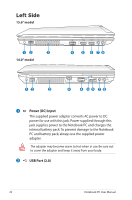
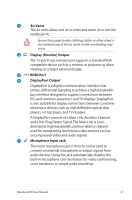
USB allows many devices to run simultaneously on a single computer, with some peripherals acting as additional plugin sites or hubs. USB supports hot-swapping of devices so that most peripherals can be connected or disconnected without restarting the computer. This port also supports USB Charger+ function that helps charge the connected USB device even when the Notebook PC is powered off. Refer to the E-Manual for details. 4 E-SATA E-SATA Port & USB Combo Port External SATA or eSATA allows external connection of SerialATA devices originally designed for use inside the computer. It is up to six times faster than existing USB 2.0, & 1394 for external storage solutions and is also hot pluggable using shielded cables and connectors up to two meters. See USB Port for description. 5 Optical Drive The Notebook PC comes in various models with different optical drives.The Notebook PC's optical drive may support compact discs (CD) ,digital video discs (DVD) and/or Blu-ray discs (BD) and may have recordable (R) or re-writable (RW) capabilities. See the marketing specifications for details on each model. 6 Optical Drive Activity Indicator The optical drive activity indicator shows when data is being transferred by the optical disk drive. This indicator will light in proportion to the data size transferred. 7 Optical Drive Electronic Eject The optical drive eject has an electronic eject button for opening the tray. You can also eject the optical drive tray through any software player or by right clicking the optical drive in Windows "Computer" and selecting Eject. Notebook PC User Manual 23
-
 1
1 -
2
-
3
-
4
-
5
-
6
-
7
-
8
-
9
-
10
-
11
-
12
-
13
-
14
-
15
-
16
-
17
-
 18
18 -
 19
19 -
 20
20 -
 21
21 -
 22
22 -
 23
23 -
 24
24 -
 25
25 -
 26
26 -
 27
27 -
 28
28 -
29
-
30
-
31
-
32
-
33
-
34
-
35
-
36
-
37
-
38
-
39
-
40
-
41
-
42
-
43
-
44
-
45
-
46
-
47
-
48
-
49
-
50
-
51
-
52
-
53
-
54
-
55
-
56
-
57
-
58
-
59
-
60
-
61
-
62
-
63
-
64
-
65
-
66
-
67
-
68
-
69
-
70
-
71
-
72
-
73
-
74
-
75
-
76
-
77
-
78
-
79
-
80
-
81
-
82
-
83
-
84
-
85
-
86
-
87
-
88
-
89
-
90
-
91
-
92
-
93
-
94
-
95
-
96
-
97
-
98
-
99
-
100
-
101
-
102
-
103
-
104
-
105
-
106
-
107
-
108
-
109
-
110
-
111
-
112
-
113
-
114
-
115
-
116
-
117
-
118
-
119
-
120
 |
 |