Asus ESC2000 User Guide - Page 41
Configuring an expansion card, IRQ assignments for this motherboard
 |
View all Asus ESC2000 manuals
Add to My Manuals
Save this manual to your list of manuals |
Page 41 highlights
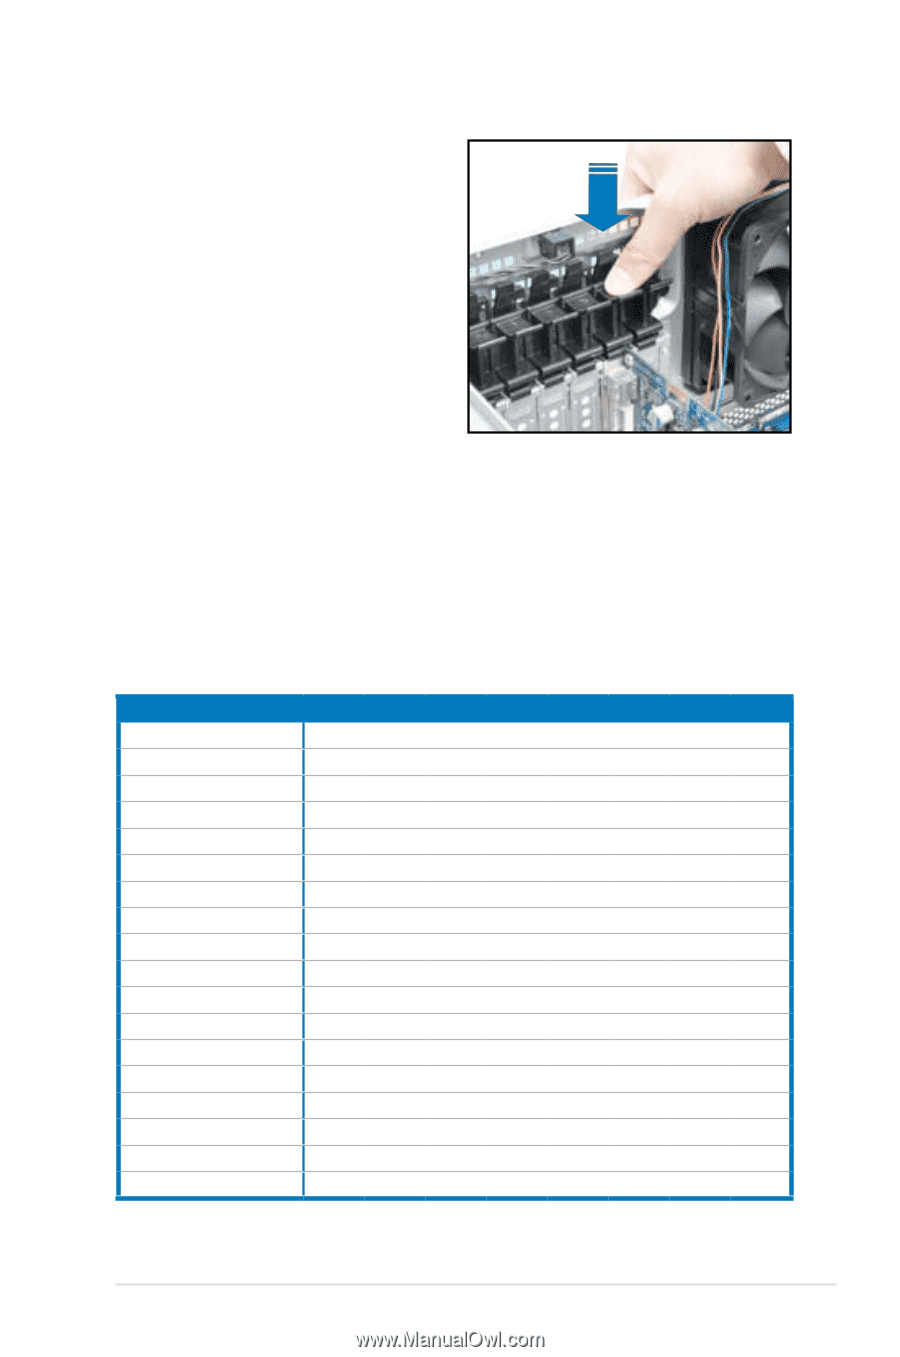
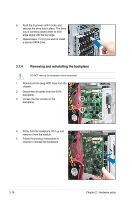
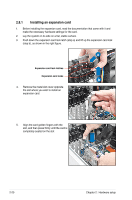
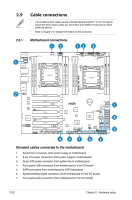
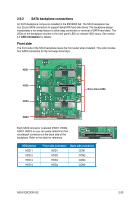
6. Restore the expansion card lock to its original position. A light click indicates that the card is locked in place. 2.8.2 Configuring an expansion card After installing the expansion card, configure the it by adjusting the software settings. 1. Turn on the system and change the necessary BIOS settings, if any. See Chapter 4 for information on BIOS setup. 2. Install the software drivers for the expansion card. IRQ assignments for this motherboard A B C D E PCIEx16_1 shared - - - - PCIEx16_2 shared - - - - PCIEx16_3 shared - - - - PCIEx16_4 shared - - - - PCIEx16_5 shared - - - - PCIEx16_6 shared - - - - PCIEx16_7 shared - - - - Marvell9230 shared - - - - VIA1394 - - shared - - Asmedia USB3.0-1 - - shared - - Asmedia USB3.0-2 - - - shared - LAN1 (82574L) shared - - - LAN2 (82574L) - shared - - - SATA Controller 1 - - - shared - SATA Controller 2 - - - shared - USB 2.0 Controller 1 - - - - - USB 2.0 Controller 2 - shared - - - HD Audio - - - - - F G H - - - - - - - - - - - - - - - - - - - - - - - - - - - - - - - - - - - - - - - - - - - - - - - shared - - - - shared - ASUS ESC2000 G2 2-21
-
 1
1 -
2
-
3
-
4
-
5
-
6
-
7
-
8
-
9
-
10
-
11
-
12
-
13
-
14
-
15
-
16
-
17
-
18
-
19
-
20
-
21
-
22
-
23
-
24
-
25
-
26
-
27
-
28
-
29
-
30
-
31
-
32
-
33
-
34
-
35
-
 36
36 -
 37
37 -
 38
38 -
 39
39 -
 40
40 -
 41
41 -
 42
42 -
 43
43 -
 44
44 -
 45
45 -
 46
46 -
47
-
48
-
49
-
50
-
51
-
52
-
53
-
54
-
55
-
56
-
57
-
58
-
59
-
60
-
61
-
62
-
63
-
64
-
65
-
66
-
67
-
68
-
69
-
70
-
71
-
72
-
73
-
74
-
75
-
76
-
77
-
78
-
79
-
80
-
81
-
82
-
83
-
84
-
85
-
86
-
87
-
88
-
89
-
90
-
91
-
92
-
93
-
94
-
95
-
96
-
97
-
98
-
99
-
100
-
101
-
102
-
103
-
104
-
105
-
106
-
107
-
108
-
109
-
110
-
111
-
112
-
113
-
114
-
115
-
116
-
117
-
118
-
119
-
120
-
121
-
122
-
123
-
124
-
125
-
126
-
127
-
128
-
129
-
130
-
131
-
132
-
133
-
134
-
135
-
136
-
137
-
138
-
139
-
140
-
141
-
142
-
143
-
144
-
145
-
146
-
147
-
148
-
149
-
150
-
151
-
152
-
153
-
154
-
155
-
156
-
157
-
158
-
159
-
160
-
161
-
162
-
163
-
164
-
165
-
166
-
167
-
168
-
169
-
170
-
171
-
172
-
173
-
174
-
175
-
176
-
177
-
178
-
179
-
180
-
181
-
182
-
183
-
184
-
185
-
186
-
187
-
188
-
189
-
190
-
191
-
192
-
193
-
194
-
195
-
196
-
197
-
198
-
199
-
200
-
201
-
202
-
203
-
204
-
205
-
206
-
207
-
208
-
209
-
210
-
211
-
212
-
213
-
214
-
215
-
216
-
217
-
218
-
219
-
220
-
221
-
222
-
223
-
224
-
225
-
226
 |
 |