Asus G50V User Manual - Page 75
RAID Function Support on selected model, SATA Operation Mode - recovery partition
 |
View all Asus G50V manuals
Add to My Manuals
Save this manual to your list of manuals |
Page 75 highlights
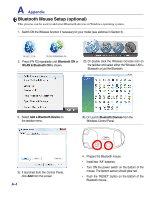
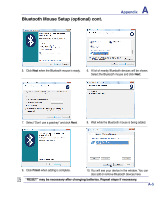
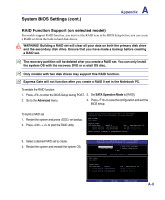
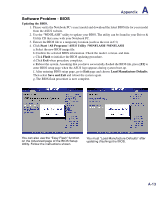
System BIOS Settings (cont.) A Appendix RAID Function Support (on selected model) For models support RAID function, you must set the RAID item in the BIOS Setup before you can create a RAID set from the built-in hard disk drives. WARNING! Building a RAID set will clear all your data on both the primary disk drive and the secondary disk drive. Ensure that you have made a backup before creating a RAID set. The recovery partition will be deleted after you create a RAID set. You can only install the system OS with the recovery DVD or a retail OS disc. Only models with two disk drives may support this RAID function. Express Gate will not function after you create a RAID 0 set in the Notebook PC. To enable the RAID function 1. Press to enter the BIOS Setup during POST. 3. Set SATA Operation Mode to [RAID]. 2. Go to the Advanced menu. 4. Press to save the configuration and exit the BIOS setup. To build a RAID set 1. Restart the system and press on bootup. 2. Press + to start the RAID utitliy. Intel(R) Matrix Storage Manager option ROM v7.0.0.1020 ICH8M-E Copyright(C) 2003-07 Intel Corporation. All Rights Reserved. RAID Volumes: None defined. Physical Disks: Port Drive Model 0 Hitachi HTS72202 1 Hitachi HTS72202 Serial # 02DP0410DTG564WP 02DP1400DEG1XRGN Size Type/Status(Vol ID) 186.3GB Non-RAID Disk 186.3GB Non-RAID Disk Press or Enter to Configuration Utility.. 3. Select a desired RAID set to create. 4. Restart the system and reinstall the system OS. Intel(R) Matrix Storage Manager option ROM v7.0.0.1020 ICH8M-E Copyright(C) 2003-07 Intel Corporation. All Rights Reserved. [ MAIN MENU ] 1. Create RAID Volume 3. Reset Disks to Non-RAID 2. Delete RAID Volume 4. Recovery Volume Options 5. Exit RAID Volumes: None defined. [ DISK/VOLUME INFORMATION ] Physical Disks: Port Drive Model Serial # 0 Hitachi HTS72202 02DP0410DTG564WP 1 Hitachi HTS72202 02DP1400DEG1XRGN Size Type/Status(Vol ID) 186.3GB Non-RAID Disk 186.3GB Non-RAID Disk [↑↓]-Select [ESC]-Exit [ENTER]-Select Menu A-9
-
 1
1 -
2
-
3
-
4
-
5
-
6
-
7
-
8
-
9
-
10
-
11
-
12
-
13
-
14
-
15
-
16
-
17
-
18
-
19
-
20
-
21
-
22
-
23
-
24
-
25
-
26
-
27
-
28
-
29
-
30
-
31
-
32
-
33
-
34
-
35
-
36
-
37
-
38
-
39
-
40
-
41
-
42
-
43
-
44
-
45
-
46
-
47
-
48
-
49
-
50
-
51
-
52
-
53
-
54
-
55
-
56
-
57
-
58
-
59
-
60
-
61
-
62
-
63
-
64
-
65
-
66
-
67
-
68
-
69
-
 70
70 -
 71
71 -
 72
72 -
 73
73 -
 74
74 -
 75
75 -
 76
76 -
 77
77 -
 78
78 -
 79
79 -
 80
80 -
81
-
82
-
83
-
84
-
85
-
86
-
87
-
88
-
89
-
90
-
91
-
92
-
93
-
94
-
95
-
96
-
97
-
98
-
99
 |
 |