Asus M3A79-T Deluxe User Manual - Page 152
Setup, Advanced Network Settings, Encryption Type
 |
UPC - 610839165599
View all Asus M3A79-T Deluxe manuals
Add to My Manuals
Save this manual to your list of manuals |
Page 152 highlights
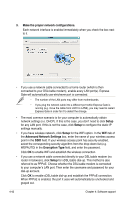
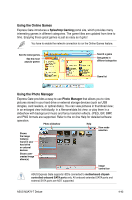
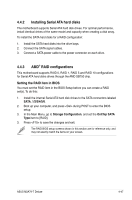
3. Make the proper network configurations. Each network interface is enabled immediately when you check the box next to it. • If you use a network cable connected to a home router (which is then connected to your DSL/cable modem), enable every LAN port(s). Express Gate will automatically use whichever port is connected. • The number of the LAN ports may differ from motherboards. • If you plug the network cable into a different port while Express Gate is running (e.g. move the cable from LAN1 to LAN2), you may need to restart Express Gate in order for it to detect the change. • The most common scenario is for your computer to automatically obtain network settings (i.e. DHCP). If this is the case, you don't need to click Setup for any LAN port. If this is not the case, click Setup to configure the static IP settings manually. • If you have wireless network, click Setup for the WiFi option. In the WiFi tab of the Advanced Network Settings box, enter the name of your wireless access point in the SSID field. If your wireless access point has security enabled, select the corresponding security algorithm from the drop-down list (e.g. WEPAUTO) in the Encryption Type field, and enter the password. Click OK to enable WiFi and establish the wireless connection. • If you use a network cable connected directly to your DSL/cable modem (no router in between), click Setup for xDSL/cable dial-up. This method is also referred to as PPPoE. Choose whether the DSL/cable modem is connected to your computer's LAN port. Then enter the username and password for your dial-up account. Click OK to enable xDSL/cable dial-up and establish the PPPoE connection. When PPPoE is enabled, the port it uses will automatically be unchecked and grayed out. 4-42 Chapter 4: Software support
-
 1
1 -
2
-
3
-
4
-
5
-
6
-
7
-
8
-
9
-
10
-
11
-
12
-
13
-
14
-
15
-
16
-
17
-
18
-
19
-
20
-
21
-
22
-
23
-
24
-
25
-
26
-
27
-
28
-
29
-
30
-
31
-
32
-
33
-
34
-
35
-
36
-
37
-
38
-
39
-
40
-
41
-
42
-
43
-
44
-
45
-
46
-
47
-
48
-
49
-
50
-
51
-
52
-
53
-
54
-
55
-
56
-
57
-
58
-
59
-
60
-
61
-
62
-
63
-
64
-
65
-
66
-
67
-
68
-
69
-
70
-
71
-
72
-
73
-
74
-
75
-
76
-
77
-
78
-
79
-
80
-
81
-
82
-
83
-
84
-
85
-
86
-
87
-
88
-
89
-
90
-
91
-
92
-
93
-
94
-
95
-
96
-
97
-
98
-
99
-
100
-
101
-
102
-
103
-
104
-
105
-
106
-
107
-
108
-
109
-
110
-
111
-
112
-
113
-
114
-
115
-
116
-
117
-
118
-
119
-
120
-
121
-
122
-
123
-
124
-
125
-
126
-
127
-
128
-
129
-
130
-
131
-
132
-
133
-
134
-
135
-
136
-
137
-
138
-
139
-
140
-
141
-
142
-
143
-
144
-
145
-
146
-
 147
147 -
 148
148 -
 149
149 -
 150
150 -
 151
151 -
 152
152 -
 153
153 -
 154
154 -
 155
155 -
 156
156 -
 157
157 -
158
-
159
-
160
-
161
-
162
-
163
-
164
 |
 |
