Asus M3A79-T Deluxe User Manual - Page 161
Creating a RAID 10 configuration
 |
UPC - 610839165599
View all Asus M3A79-T Deluxe manuals
Add to My Manuals
Save this manual to your list of manuals |
Page 161 highlights
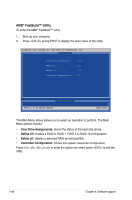
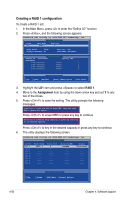
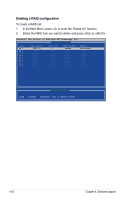
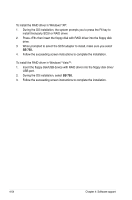
Creating a RAID 10 configuration To create a RAID 10 set: 1. In the Main Menu, press to enter the "Define LD" function. 2. Press , and the following screen appears. FastBuild (tm) Utility (c) 2004-2005 ATI Technology, Inc. [ Define LD Menu ] LD No LD 1 RAID Mode RAID 10 Total Drv 4 Strip Block: 64 KB Gigabyte Boundary: ON Fast Init: OFF Cache Mode: WriteThru [ Define LD Menu ] Channel:ID Drive Model Capacity (MB) Assignment 1:Mas xxxxxxxxx xxxxxx Y 2:Mas xxxxxxxxx xxxxxx Y 3:Mas xxxxxxxxx xxxxxx Y 4:Mas xxxxxxxxx xxxxxx Y [ Keys Available ] [↑]Up [↓]Down [ESC]Exit [Space] Change Option [Ctrl-Y]Save 3. Highlight the LD1 item and press to select RAID 10. 4. Move to the Assignment item by using the down arrow key and set Y to any four of the drives. 5. Press to save the setting. The utility prompts the following messages: Press Ctrl-Y if you are sure to erase MBR! Press any other key to ignore this option... Press to erase MBR or press any key to continue. Press Ctrl-Y to Modify Array Capacity or press any other key to use maxinum capacity... Press to key in the desired capacity or press any key to continue. 6. The utility displays the following screen. FastBuild (tm) Utility (c) 2004-2005 ATI Technology, Inc. [ Define LD Menu ] LD No LD 1 LD 2 LD 3 LD 4 LD 5 LD 6 LD 7 LD 8 RAID Mode RAID 10 Total Drv 4 Capacity(MB) xxxxxx Status Functional [↑]Up [ Keys Available ] [↓]Down [ESC]Exit [Enter] Select ASUS M3A79-T Deluxe 4-51
-
 1
1 -
2
-
3
-
4
-
5
-
6
-
7
-
8
-
9
-
10
-
11
-
12
-
13
-
14
-
15
-
16
-
17
-
18
-
19
-
20
-
21
-
22
-
23
-
24
-
25
-
26
-
27
-
28
-
29
-
30
-
31
-
32
-
33
-
34
-
35
-
36
-
37
-
38
-
39
-
40
-
41
-
42
-
43
-
44
-
45
-
46
-
47
-
48
-
49
-
50
-
51
-
52
-
53
-
54
-
55
-
56
-
57
-
58
-
59
-
60
-
61
-
62
-
63
-
64
-
65
-
66
-
67
-
68
-
69
-
70
-
71
-
72
-
73
-
74
-
75
-
76
-
77
-
78
-
79
-
80
-
81
-
82
-
83
-
84
-
85
-
86
-
87
-
88
-
89
-
90
-
91
-
92
-
93
-
94
-
95
-
96
-
97
-
98
-
99
-
100
-
101
-
102
-
103
-
104
-
105
-
106
-
107
-
108
-
109
-
110
-
111
-
112
-
113
-
114
-
115
-
116
-
117
-
118
-
119
-
120
-
121
-
122
-
123
-
124
-
125
-
126
-
127
-
128
-
129
-
130
-
131
-
132
-
133
-
134
-
135
-
136
-
137
-
138
-
139
-
140
-
141
-
142
-
143
-
144
-
145
-
146
-
147
-
148
-
149
-
150
-
151
-
152
-
153
-
154
-
155
-
 156
156 -
 157
157 -
 158
158 -
 159
159 -
 160
160 -
 161
161 -
 162
162 -
 163
163 -
 164
164
 |
 |
