Asus P2-P5N9300 User Manual - Page 47
Saving the current BIOS, Flashing Complete, <F1>, <Enter>, Updating the BIOS
 |
View all Asus P2-P5N9300 manuals
Add to My Manuals
Save this manual to your list of manuals |
Page 47 highlights
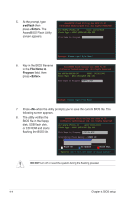
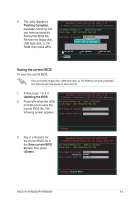
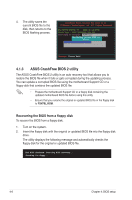
9. The utility displays a Flashing Complete message indicating that you have successfully flashed the BIOS file. Remove the floppy disk, USB flash disk, or CD ROM, then press AwardBIOS Flash Utility for ASUS V1.32 (C)Phoenix Technologies Ltd. All Rights Reserved For MCP7A-P5N78L-00 DATE:10/16/2008 Flash Type - MXIC M25L4005 8Mb SPI File Name to Program: P5N78L.BIN Flashing Complete Press to Continue Write OK F1 Reset No Update Write Fail Saving the current BIOS To save the current BIOS: Ensure that the floppy disk, USB flash disk, or CD ROM is not write-protected and has enough free space to save the file. 1. Follow steps 1 to 6 in Updating the BIOS. AwardBIOS Flash Utility for ASUS V1.32 (C)Phoenix Technologies Ltd. All Rights Reserved 2. Press when the utility For MCP7A-P5N78L-00 DATE:10/16/2008 prompts you to save the Flash Type - MXIC M25L4005 8Mb SPI current BIOS file. The File Name to Program: 0306.bin following screen appears. Save current BIOS as: Message: 3. Key in a filename for the current BIOS file in the Save current BIOS as field, then press . AwardBIOS Flash Utility for ASUS V1.32 (C)Phoenix Technologies Ltd. All Rights Reserved For MCP7A-P5N78L-00 DATE:10/16/2008 Flash Type - MXIC M25L4005 8Mb SPI File Name to Program: 0306.bin Checksum: 810DH Save current BIOS as: 0307.bin Message: Please Wait! ASUS P2-P5N9300/P4-P5N9300 4-5
-
 1
1 -
2
-
3
-
4
-
5
-
6
-
7
-
8
-
9
-
10
-
11
-
12
-
13
-
14
-
15
-
16
-
17
-
18
-
19
-
20
-
21
-
22
-
23
-
24
-
25
-
26
-
27
-
28
-
29
-
30
-
31
-
32
-
33
-
34
-
35
-
36
-
37
-
38
-
39
-
40
-
41
-
 42
42 -
 43
43 -
 44
44 -
 45
45 -
 46
46 -
 47
47 -
 48
48 -
 49
49 -
 50
50 -
 51
51 -
 52
52 -
53
-
54
-
55
-
56
-
57
-
58
-
59
-
60
-
61
-
62
-
63
-
64
-
65
-
66
-
67
-
68
-
69
-
70
-
71
-
72
-
73
-
74
-
75
-
76
-
77
-
78
-
79
-
80
-
81
-
82
 |
 |
