Asus P2-P5N9300 User Manual - Page 50
ASUS EZ Flash 2 utility, <Alt> + <F2>, <Del>, Tools, EZ Flash2, <Enter>
 |
View all Asus P2-P5N9300 manuals
Add to My Manuals
Save this manual to your list of manuals |
Page 50 highlights
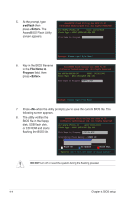
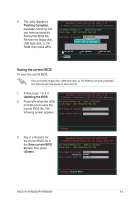
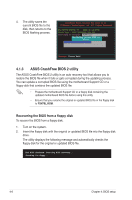
4.1.4 ASUS EZ Flash 2 utility The ASUS EZ Flash 2 feature allows you to update the BIOS without having to go through the long process of booting from a floppy disk and using a DOS‑based utility. The EZ Flash 2 utility is built in the BIOS chip so it is accessible by pressing + during the Power-On Self-Test (POST). To update the BIOS using EZ Flash 2: 1. Visit the ASUS website at www.asus.com to download the latest BIOS file for this motherboard. 2. Save the BIOS file to a floppy disk or USB flash disk, then restart the system. 3. Launch EZ Flash 2 using either of the following methods. • Insert the floppy disk / USB flash disk that contains the BIOS file to the floppy disk drive or a USB port. Press + during POST to display the following. ASUSTek EZ Flash 2 BIOS ROM Utility B334 FLASH TYPE: MXIC MX25L8005 8Mb SPI Current ROM BOARD: P5N78L VER: 0306 DATE: 10/16/2008 Update ROM BOARD: Unknown VER: Unknown DATE: Unknown PATH: C:\ C: Note [Enter] Select [Tab] Switch [S] Save [Esc] Exit [Up/Down/Home/End] Move • Insert the floppy disk / USB flash disk that contains the BIOS file to the floppy disk drive or a USB port. Press during POST to enter the BIOS Setup utility. Go to the Tools menu, then select EZ Flash2 and press . 4. Press to locate the correct file. Then press . When the correct BIOS file is found, EZ Flash 2 performs the BIOS update process and automatically reboots the system when done. • This function supports devices such as USB flash disks and floppy disks with FAT 32/16 format and single partition only. • DO NOT shut down or reset the system while updating the BIOS to prevent system boot failure! 4-8 Chapter 4: BIOS setup
-
 1
1 -
2
-
3
-
4
-
5
-
6
-
7
-
8
-
9
-
10
-
11
-
12
-
13
-
14
-
15
-
16
-
17
-
18
-
19
-
20
-
21
-
22
-
23
-
24
-
25
-
26
-
27
-
28
-
29
-
30
-
31
-
32
-
33
-
34
-
35
-
36
-
37
-
38
-
39
-
40
-
41
-
42
-
43
-
44
-
 45
45 -
 46
46 -
 47
47 -
 48
48 -
 49
49 -
 50
50 -
 51
51 -
 52
52 -
 53
53 -
 54
54 -
 55
55 -
56
-
57
-
58
-
59
-
60
-
61
-
62
-
63
-
64
-
65
-
66
-
67
-
68
-
69
-
70
-
71
-
72
-
73
-
74
-
75
-
76
-
77
-
78
-
79
-
80
-
81
-
82
 |
 |
