Asus P4BP-MX P4BP-MX User Manual - Page 35
Using AFLASH to update the BIOS - bios update
 |
View all Asus P4BP-MX manuals
Add to My Manuals
Save this manual to your list of manuals |
Page 35 highlights
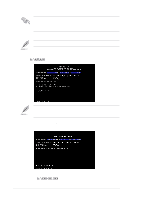
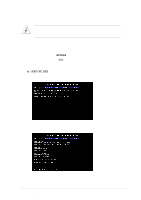
5. At the prompt, "Please Enter File Name for NEW BIOS: _", type in the BIOS file name that you downloaded from the ASUS website, then press . EZ Flash will automatically access drive A to look for the file name that you typed. When found, the following message appears on screen. [BIOS Information in File] BIOS Version: P4BP-MX Boot Block WARNING! Continue to update the BIOS (Y/N)? _ If you accidentally typed in a wrong BIOS file name, the error message, "WARNING! File not found." appears. Press to remove the message, then type in the correct file name and press . 6. At the above prompt, type to continue with the update process or press to exit EZ Flash and reboot the system without updating the BIOS. The following prompt appears if you typed . Flash Memory: SST 39SF020 Update Main BIOS area (Y/N)? _ 7. Press to update the main BIOS area. DO NOT shutdown or reset the system while updating the BIOS area! Doing so may cause system boot failure. 8. When finished, the message, "Press a key to reboot" appears. Press any key to reboot the system with the new BIOS. 2.1.2 Using AFLASH to update the BIOS Creating a bootable disk AFLASH.EXE is a Flash Memory Writer utility that updates the BIOS by uploading a new BIOS file to the programmable flash ROM on the motherboard. This file works only in DOS mode. To determine the BIOS version of your motherboard, check the last four numbers of the code displayed on the upper left-hand corner of your screen during bootup. Larger numbers represent a newer BIOS file. To create a bootable floppy disk: 1. Insert a floppy disk to the floppy disk drive. 2. At the DOS prompt, type the command line: FORMAT A:/S then press . Wait for a few minutes to complete format process. 3. Copy AFLASH.EXE to the boot disk you created. To copy, type the command line: COPY D:\AFLASH.EXE\AFLASH.EXE A:\ then press . ASUS P4BP-MX motherboard 2-3
-
 1
1 -
2
-
3
-
4
-
5
-
6
-
7
-
8
-
9
-
10
-
11
-
12
-
13
-
14
-
15
-
16
-
17
-
18
-
19
-
20
-
21
-
22
-
23
-
24
-
25
-
26
-
27
-
28
-
29
-
 30
30 -
 31
31 -
 32
32 -
 33
33 -
 34
34 -
 35
35 -
 36
36 -
 37
37 -
 38
38 -
 39
39 -
 40
40 -
41
-
42
-
43
-
44
-
45
-
46
-
47
-
48
-
49
-
50
-
51
-
52
-
53
-
54
-
55
-
56
-
57
-
58
-
59
-
60
-
61
-
62
-
63
-
64
 |
 |
