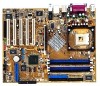
Asus P4P800 Deluxe Motherboard DIY Troubleshooting Guide - Page 63
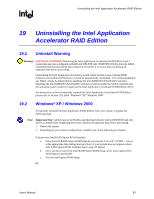
Uninstalling the Intel Application Accelerator RAID Edition, Uninstall Warning
 |
View all Asus P4P800 Deluxe manuals
Add to My Manuals
Save this manual to your list of manuals |
Page 63 highlights
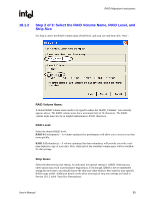
Uninstalling the Intel Application Accelerator RAID Edition R 19 Uninstalling the Intel Application Accelerator RAID Edition 19.1 Uninstall Warning Warning: CRITICAL WARNING: Removing the Intel Application Accelerator RAID Edition from a system that has been configured as RAID will DELETE ALL EXISTING DATA from the RAIDcontrolled hard drive(s) and the data cannot be recovered. It is critical that you backup all important data before proceeding. Uninstalling the Intel Application Accelerator would render all data on any existing RAID Volumes inaccessible and therefore it cannot be automatically uninstalled. It is recommended that any RAID volume be deleted before disabling the Intel 82801ER SATA RAID Controller. Disabling the Intel 82801ER SATA RAID Controller would re-enable the SATA controller and the operating system would no longer use the Intel Application Accelerator RAID Edition driver. For instructions on how to manually uninstall the Intel Application Accelerator RAID Edition, please refer to Section 19.2 titled 'Windows* XP / Windows 2000'. 19.2 Windows* XP / Windows 2000 To manually uninstall the Intel Application RAID Edition from your system, complete the following steps: Note: Important Note: All the data on the RAID-controlled hard drive(s) will be DELETED and will not be accessible after completing these steps. Backup all important data before proceeding. 1. Reboot the system 2. Depending on your system configuration, complete one of the following set of tasks: If System has Intel RAID Option ROM Installed: a. Enter the Intel RAID Option ROM Setup by pressing the 'Ctrl' and 'i' (CTRL + i) keys at the appropriate time during boot-up. (Note: If your system does not appear to have Intel RAID Option ROM installed, skip to step '2d' below) b. Once you have entered the Intel RAID Option ROM Setup, select menu option #3 to 'Reset disks to non-RAID'. c. Exit the Intel Option ROM Setup or User's Manual 63
-
 1
1 -
2
-
3
-
4
-
5
-
6
-
7
-
8
-
9
-
10
-
11
-
12
-
13
-
14
-
15
-
16
-
17
-
18
-
19
-
20
-
21
-
22
-
23
-
24
-
25
-
26
-
27
-
28
-
29
-
30
-
31
-
32
-
33
-
34
-
35
-
36
-
37
-
38
-
39
-
40
-
41
-
42
-
43
-
44
-
45
-
46
-
47
-
48
-
49
-
50
-
51
-
52
-
53
-
54
-
55
-
56
-
57
-
 58
58 -
 59
59 -
 60
60 -
 61
61 -
 62
62 -
 63
63 -
 64
64 -
 65
65 -
 66
66 -
 67
67 -
 68
68 -
69
-
70
-
71
-
72
-
73
-
74
-
75
-
76
-
77
-
78
-
79
-
80
-
81
-
82
-
83
-
84
-
85
 |
 |
