Asus P4V8X-MX Motherboard DIY Troubleshooting Guide - Page 68
Setting the BIOS RAID items, Entering the VIA Tech RAID BIOS Utility, Create Array - x via vt8237 sata 2
 |
View all Asus P4V8X-MX manuals
Add to My Manuals
Save this manual to your list of manuals |
Page 68 highlights
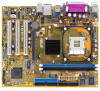
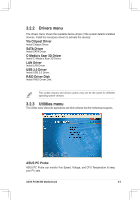
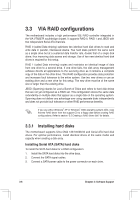
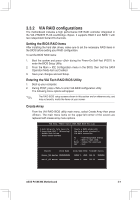
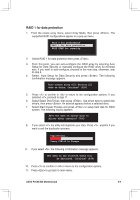
3.3.2 VIA RAID configurations The motherboard includes a high performance IDE RAID controller integrated in the VIA VT8237R PLUS southbridge chipset. It supports RAID 0 and RAID 1 with two independent Serial ATA channels. Setting the BIOS RAID items After installing the hard disk drives, make sure to set the necessary RAID items in the BIOS before setting your RAID configuration. To set the BIOS RAID items: 1. Boot the system and press during the Power-On Self-Test (POST) to enter the BIOS Setup Utility. 2. From the Main > IDE Configuration menu in the BIOS, then Set the SATA Operation Mode item as Enabled. 3. Save your changes and exit Setup. Entering the VIA Tech RAID BIOS Utility 1. Boot up your computer. 2. During POST, press to enter VIA RAID configuration utility. The following menu options will appear. The RAID BIOS setup screens shown in this section are for reference only, and may not exactly match the items on your screen. Create Array From the VIA RAID BIOS utility main menu, select Create Array then press . The main menu items on the upper-left corner of the screen are replaced with create array menu options. VIA Tech. VT8237 Series SATA RAID BIOS Ver x.xx Auto Setup For Data Security Array Mode RAID 1 (Mirroring) Select Disk Drives Start Create Process Create a RAID array with the hard disks attached to VIA RAID controller F1 : View Array/Disk Status ↑,↓ : Move to next item Enter : Confirm the selection ESC : Exit Channel Drive Name Array Name Mode Size(GB) Status Serial_Ch0 Master XXXXXXXXXXX ARRAY 0 SATA 999.99 XXXXXXX Serial_Ch1 Master XXXXXXXXXXX ARRAY 0 SATA 999.99 XXXXXXX ASUS P4V8X-MX Motherboard 3-7
-
 1
1 -
2
-
3
-
4
-
5
-
6
-
7
-
8
-
9
-
10
-
11
-
12
-
13
-
14
-
15
-
16
-
17
-
18
-
19
-
20
-
21
-
22
-
23
-
24
-
25
-
26
-
27
-
28
-
29
-
30
-
31
-
32
-
33
-
34
-
35
-
36
-
37
-
38
-
39
-
40
-
41
-
42
-
43
-
44
-
45
-
46
-
47
-
48
-
49
-
50
-
51
-
52
-
53
-
54
-
55
-
56
-
57
-
58
-
59
-
60
-
61
-
62
-
 63
63 -
 64
64 -
 65
65 -
 66
66 -
 67
67 -
 68
68 -
 69
69 -
 70
70 -
 71
71
 |
 |