Asus P5G41T-M LX2 BR User Manual - Page 25
ASUS Express Gate - driver download
 |
View all Asus P5G41T-M LX2 BR manuals
Add to My Manuals
Save this manual to your list of manuals |
Page 25 highlights
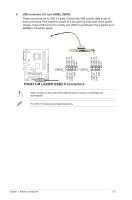
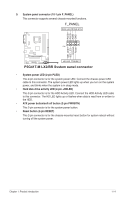
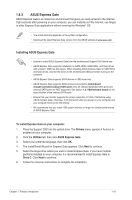
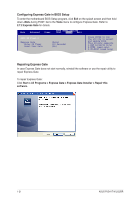
1.8.3 ASUS Express Gate ASUS Express Gate is an instant-on environment that gives you quick access to the Internet. Eight seconds after powering on your computer, you can instantly surf the Internet, use Skype or other Express Gate applications without entering the Windows® OS. • The actual boot time depends on the system configuration. • Download the latest Express Gate version from the ASUS website at www.asus.com. Installing ASUS Express Gate • Ensure to install ASUS Express Gate from the motherboard Support DVD before use. • ASUS Express Gate supports installation on SATA HDDs, USB HDDs, and flash drives with at least 1.2GB free disk space. When installing ASUS Express Gate on USB HDDs and flash drives, connect the drives to the motherboard USB port before turning on the computer. • ASUS Express Gate supports SATA devices in IDE mode only. • ASUS Express Gate supports SATA devices connected to motherboard chipset-controlled onboard SATA ports only. All onboard extended SATA ports and external SATA ports are NOT supported. See section 1.2.1 Motherboard layout for the exact location of the onboard SATA ports. • Ensure that your monitor supports the screen resolution of 1024 x 768 before using ASUS Express Gate; otherwise, it will not launch after you power on your computer and your computer boots to the OS directly. • We recommend that you install 1GB system memory or larger for a better performance of ASUS Express Gate. To install Express Gate on your computer: 1. Place the Support DVD into the optical drive. The Drivers menu appears if Autorun is enabled on your computer. 2. Click the Utilities tab, then click ASUS Express Gate. 3. Select your preferred language, then click OK. 4. The InstallShield Wizard for Express Gate appears. Click Next to continue. 5. Select the target drive where you want to install Express Gate. If you have multiple partitions installed on your computer, it is recommended to install Express Gate in Drive C. Click Next to continue. 6. Follow the onscreen instructions to complete the installation. Chapter 1: Product introduction 1-16
-
 1
1 -
2
-
3
-
4
-
5
-
6
-
7
-
8
-
9
-
10
-
11
-
12
-
13
-
14
-
15
-
16
-
17
-
18
-
19
-
 20
20 -
 21
21 -
 22
22 -
 23
23 -
 24
24 -
 25
25 -
 26
26 -
 27
27 -
 28
28 -
 29
29 -
 30
30 -
31
-
32
-
33
-
34
-
35
-
36
-
37
-
38
-
39
-
40
-
41
-
42
-
43
-
44
-
45
 |
 |
