Asus P5G41T-M LX2 BR User Manual - Page 28
Accessing the Internet
 |
View all Asus P5G41T-M LX2 BR manuals
Add to My Manuals
Save this manual to your list of manuals |
Page 28 highlights
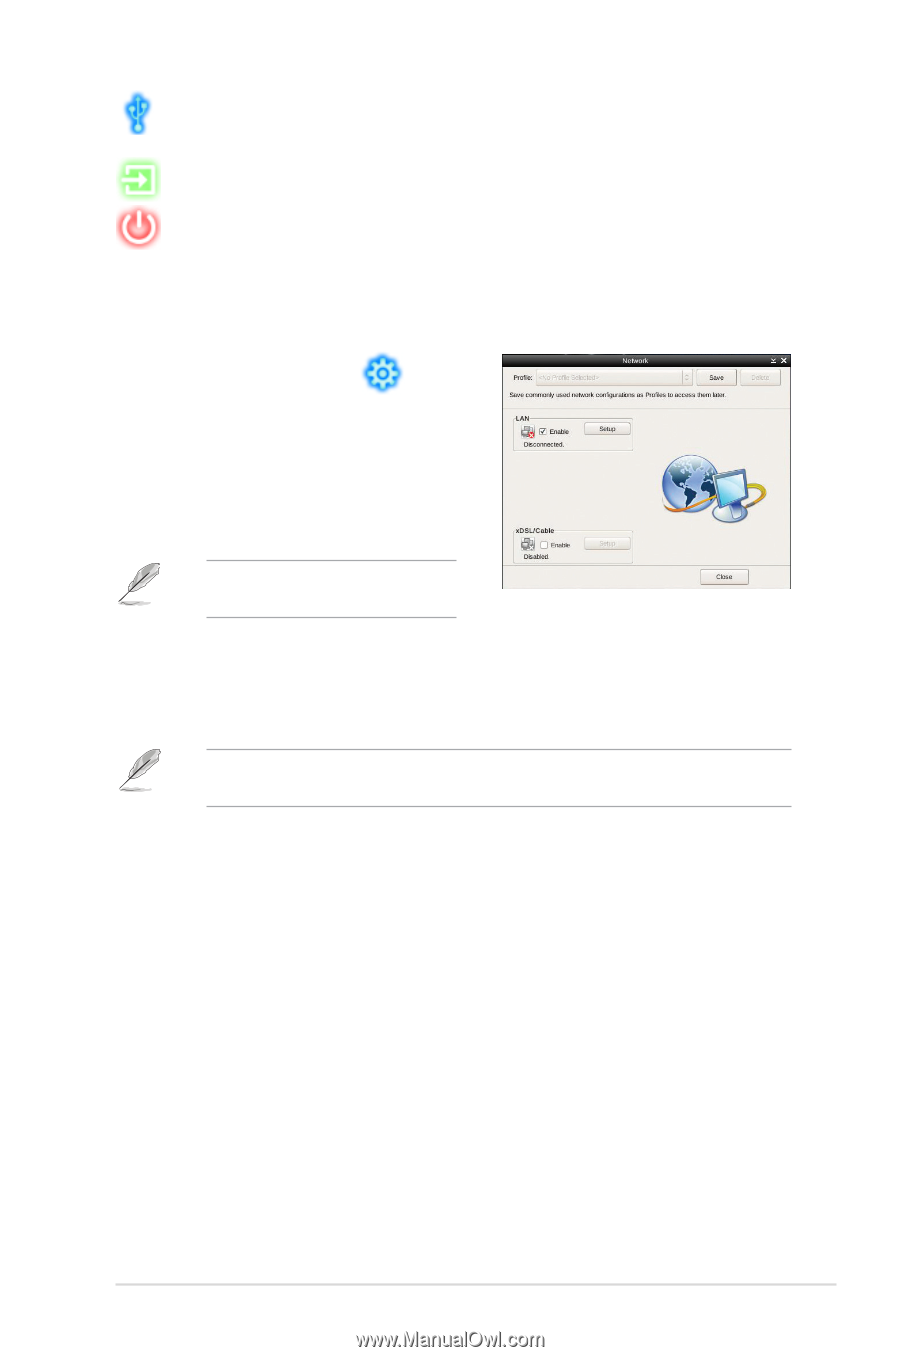
This icon appears only when a removable storage device / USB drive is connected. Left-click this icon to launch the File Manager window. Right-click it to eject the removable storage device / USB drive. Exits ASUS Express Gate. Click Yes to enter the operating system you installed on the hard disk drive. Powers off the computer. Accessing the Internet To configure the network settings: 1. Click Configuration Panel LaunchBar. on the 2. Click Network. 3. Make the proper network configurations. Each network interface is enabled immediately after you tick the Enable checkbox. The number of the LAN ports vary with the motherboard. • LAN settings If you connect your computer to a home router that is connected to your DSL/cable modem, enable all the LAN ports. Express Gate automatically uses the connected port. If you plug the network cable into a different port while Express Gate is running (e.g. move the cable from LAN1 to LAN2, restart Express Gate to activate the new setting. If your computer does not automatically get network settings from a DHCP server, click Setup to configure the static IP settings manually. If your computer automatically gets network settings from a DHCP server, skip this step. • WiFi settings (if supported) If you want to connect to a wireless network, click Setup to configure the WiFi options. In the WiFi tab of the Advanced Network Settings box, key in the network name of the wireless access point in the SSID field. If Security is enabled on the wireless access point, select the corresponding security algorithm from the dropdown list such as WEP or WAP in the Encryption Type field, and key in the password. Click OK to enable WiFi and establish the wireless connection. 1-19 ASUS P5G41T-M LX2/BR
-
 1
1 -
2
-
3
-
4
-
5
-
6
-
7
-
8
-
9
-
10
-
11
-
12
-
13
-
14
-
15
-
16
-
17
-
18
-
19
-
20
-
21
-
22
-
 23
23 -
 24
24 -
 25
25 -
 26
26 -
 27
27 -
 28
28 -
 29
29 -
 30
30 -
 31
31 -
 32
32 -
 33
33 -
34
-
35
-
36
-
37
-
38
-
39
-
40
-
41
-
42
-
43
-
44
-
45
 |
 |