Asus P5G41T-M LX2 BR User Manual - Page 30
Configuring Express Gate in BIOS Setup
 |
View all Asus P5G41T-M LX2 BR manuals
Add to My Manuals
Save this manual to your list of manuals |
Page 30 highlights
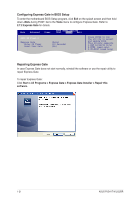
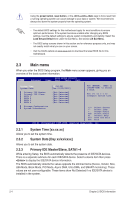
Configuring Express Gate in BIOS Setup To enter the motherboard BIOS Setup program, click Exit on the splash screen and then hold down during POST. Go to the Tools menu to configure Express Gate. Refer to 2.7.2 Express Gate for details. Main Advanced Power BIOS SETUP UTILITY Boot Tools Exit ASUS EZ Flash 2 Express Gate Enter OS Timer Reset User Data [Auto] [10 Seconds] [No] Press ENTER to run the utility to select and update BIOS. This utility supports 1.FAT 12/16/32 (r/w) 2.NTFS (read only) 3.CD-DISC (read only) Repairing Express Gate In case Express Gate does not start normally, reinstall the software or use the repair utility to repair Express Gate. To repair Express Gate: Click Start > All Programs > Express Gate > Express Gate Installer > Repair this software. 1-21 ASUS P5G41T-M LX2/BR
-
 1
1 -
2
-
3
-
4
-
5
-
6
-
7
-
8
-
9
-
10
-
11
-
12
-
13
-
14
-
15
-
16
-
17
-
18
-
19
-
20
-
21
-
22
-
23
-
24
-
 25
25 -
 26
26 -
 27
27 -
 28
28 -
 29
29 -
 30
30 -
 31
31 -
 32
32 -
 33
33 -
 34
34 -
 35
35 -
36
-
37
-
38
-
39
-
40
-
41
-
42
-
43
-
44
-
45
 |
 |