Asus P5QC User Manual - Page 150
ASUS Drive Xpert, Installing Serial ATA hard disks, Launching Drive Xpert in Windows - motherboard drivers windows 7
 |
UPC - 610839162864
View all Asus P5QC manuals
Add to My Manuals
Save this manual to your list of manuals |
Page 150 highlights
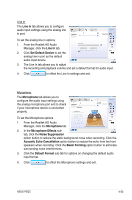
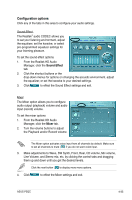
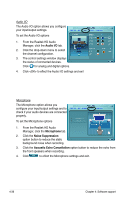
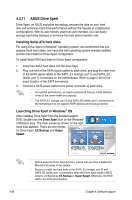
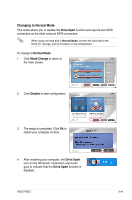
4.3.11 ASUS Drive Xpert Drive Xpert, an ASUS exclusive technology, secures the data on your hard disk and enhances hard drive performance without the hassles of complicated configurations. With its user-friendly graphical user interface, you can easily arrange hard drive backups or enhance the hard drive's transfer rate. Installing Serial ATA hard disks For using Drive Xpert in Windows® operating system, we recommend that you prepare three hard disks: one hard disk with operating system already installed, and two hard disks for Drive Xpert configuration. To install Serial ATA hard disks for Drive Xpert configuration 1. Install two SATA hard disks into the drive bays. 2. Plug one end of the SATA signal cables to each drive, and plug the other end of the SATA signal cables to the SATA_E1 (orange, port 0) and SATA_E2 (white, port 1) connectors on the motherboard. Refer to page 2-30 for the exact location of the SATA connectors. 3. Connect a SATA power cable to the power connector of each drive. • For optimal performance, we highly recommend that you install identical drives of the same model and capacity. • The SATA_E1 (orange, port 0) and SATA_E2 (white, port 1) connectors on the motherboard do not support ATAPI devices and hot-plug function. Launching Drive Xpert in Windows® OS After installing Drive Xpert from the bundled support DVD, double-click the Drive Xpert icon on the Windows® notification area. The main screen as shown on the right hand side appears. There are two modes for Drive Xpert: EZ Backup and Super Speed. • Before using the Drive Xpert function, ensure that you have installed the Marvell 61xx driver in the system. • Ensure to install two hard disks to the SATA_E1 (orange, port 0) and SATA_E2 (white, port 1) connectors when the Drive Xpert mode in BIOS setup is configured as EZ Backup or Super Speed. Otherwise, the HDD LED in the front panel flashes. 4-38 Chapter 4: Software support
-
 1
1 -
2
-
3
-
4
-
5
-
6
-
7
-
8
-
9
-
10
-
11
-
12
-
13
-
14
-
15
-
16
-
17
-
18
-
19
-
20
-
21
-
22
-
23
-
24
-
25
-
26
-
27
-
28
-
29
-
30
-
31
-
32
-
33
-
34
-
35
-
36
-
37
-
38
-
39
-
40
-
41
-
42
-
43
-
44
-
45
-
46
-
47
-
48
-
49
-
50
-
51
-
52
-
53
-
54
-
55
-
56
-
57
-
58
-
59
-
60
-
61
-
62
-
63
-
64
-
65
-
66
-
67
-
68
-
69
-
70
-
71
-
72
-
73
-
74
-
75
-
76
-
77
-
78
-
79
-
80
-
81
-
82
-
83
-
84
-
85
-
86
-
87
-
88
-
89
-
90
-
91
-
92
-
93
-
94
-
95
-
96
-
97
-
98
-
99
-
100
-
101
-
102
-
103
-
104
-
105
-
106
-
107
-
108
-
109
-
110
-
111
-
112
-
113
-
114
-
115
-
116
-
117
-
118
-
119
-
120
-
121
-
122
-
123
-
124
-
125
-
126
-
127
-
128
-
129
-
130
-
131
-
132
-
133
-
134
-
135
-
136
-
137
-
138
-
139
-
140
-
141
-
142
-
143
-
144
-
 145
145 -
 146
146 -
 147
147 -
 148
148 -
 149
149 -
 150
150 -
 151
151 -
 152
152 -
 153
153 -
 154
154 -
 155
155 -
156
-
157
-
158
-
159
-
160
-
161
-
162
-
163
-
164
-
165
-
166
-
167
-
168
-
169
-
170
-
171
-
172
-
173
-
174
-
175
-
176
-
177
-
178
-
179
-
180
-
181
-
182
-
183
-
184
-
185
-
186
-
187
-
188
 |
 |