Asus P7F-X User Manual - Page 111
Marvell, 88SE6145 RAID BIOS
 |
UPC - 610839172986
View all Asus P7F-X manuals
Add to My Manuals
Save this manual to your list of manuals |
Page 111 highlights
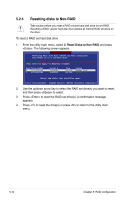
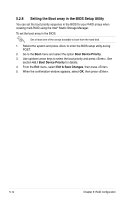
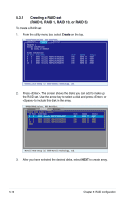
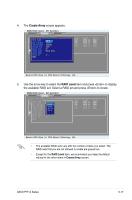
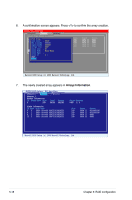
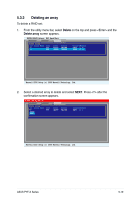
5.3 Marvell® 88SE6145 RAID BIOS configuration utility (P7F-X/SATA model only) The Marvell® 88SE6145 RAID BIOS Configuration utility allows you to create RAID 0, RAID 1, RAID 10 ,and RAID 5 set(s) from Serial ATA hard disk drives that are connected to the Serial ATA connectors supported by the Southbridge. To enter the Marvell® RAID BIOS Configuration utility: 1. Install all the Serial ATA hard disk drives at Red SATA Connector. 2. Turn on the system. 3. During POST, press + to enter the utility main menu. ENTER/SPACE:Select, ESC:Back/Exit [Adapter] [Create] [Delete] Adapter 1 Arrays Information: No array is defined! Disks Information: ID Port Disk Name 0 0 SATA: Hitachi HDS721010KLA330 4 1 SATA: Hitachi HDS721010KLA330 8 2 SATA: Hitachi HDS721010KLA330 12 3 SATA: Hitachi HDS721010KLA330 Size Speed Status 1TB SATA II FREE 1TB SATA II FREE 1TB SATA II FREE 1TB SATA II FREE Marvell BIOS Setup (c) 2006 Marvell Technology, Ltd. 4. Press and select a desired adapter for RAID configuration. ENTER/SPACE:Select, ESC:Back/Exit [Adapter] [Create] [Delete] Select Adapter Adapter 1 Marvell BIOS Setup (c) 2006 Marvell Technology, Ltd. The RAID BIOS setup screens shown in this section are for reference only and may not exactly match the items on your screen. ASUS P7F-X Series 5-15
-
 1
1 -
2
-
3
-
4
-
5
-
6
-
7
-
8
-
9
-
10
-
11
-
12
-
13
-
14
-
15
-
16
-
17
-
18
-
19
-
20
-
21
-
22
-
23
-
24
-
25
-
26
-
27
-
28
-
29
-
30
-
31
-
32
-
33
-
34
-
35
-
36
-
37
-
38
-
39
-
40
-
41
-
42
-
43
-
44
-
45
-
46
-
47
-
48
-
49
-
50
-
51
-
52
-
53
-
54
-
55
-
56
-
57
-
58
-
59
-
60
-
61
-
62
-
63
-
64
-
65
-
66
-
67
-
68
-
69
-
70
-
71
-
72
-
73
-
74
-
75
-
76
-
77
-
78
-
79
-
80
-
81
-
82
-
83
-
84
-
85
-
86
-
87
-
88
-
89
-
90
-
91
-
92
-
93
-
94
-
95
-
96
-
97
-
98
-
99
-
100
-
101
-
102
-
103
-
104
-
105
-
 106
106 -
 107
107 -
 108
108 -
 109
109 -
 110
110 -
 111
111 -
 112
112 -
 113
113 -
 114
114 -
 115
115 -
 116
116 -
117
-
118
-
119
-
120
-
121
-
122
-
123
-
124
-
125
-
126
-
127
-
128
-
129
-
130
-
131
-
132
-
133
-
134
-
135
-
136
 |
 |
