Asus P8B75-M P8B75-M User's Manual - Page 58
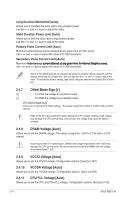
DRAM Voltage [Auto], VCCIO Voltage [Auto], VCCSA Voltage [Auto], CPU PLL Voltage [Auto]
 |
View all Asus P8B75-M manuals
Add to My Manuals
Save this manual to your list of manuals |
Page 58 highlights
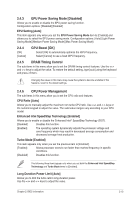
Long Duration Maintained [Auto] Allows you to maintain the turbo ratio's long duration power. Use the and keys to adjust the value. Short Duration Power Limit [Auto] Allows you to limit the turbo ratio's long duration power. Use the and keys to adjust the value. Primary Plane Current Limit [Auto] Maximum instantaneous current allowed at any given time for CPU cores Use and key to adjust the value at 0.125A increment.��. Secondary Plane Current Limit [Auto] Maximum �in�s�t�a�n��ta�n��e�o�u��s�c�u��r�re��n�t�a�l�lo��w�e��d����a���t��a��n���y����g��i�v��e���n����t�i�m����e����f�o���r��I��n��t��e��r��n��a��l���G�r�a�p��h�ic��s�c�o��re��s�. Use and key to adjust the value at 0.125A increment. Some of the following items are adjusted by typing the desired values using the numeric keypad and press the key. You can also use the and keys to adjust the value. To restore the default setting, type [auto] using the keyboard and press the key. 2.4.7 [+] [-] Offset Mode Sign [+] To offset the voltage by a positive value. To offset the voltage by a negative value. CPU Offset Voltage [Auto] Allows you to set the CPU Offset voltage. The values range from 0.005V to 0.635V with a 0.005V interval. Refer to the CPU documentation before setting the CPU voltage. Setting a high voltage may damage the CPU permanently, and setting a low voltage may make the system unstable. 2.4.8 DRAM Voltage [Auto] Allows you to set the DRAM voltage. The values range from 1.20V to 2.13V with a 0.01V interval. According to Intel CPU specification, DIMMs with voltage requirement over 1.65V may damage the CPU permanently. We recommend you install the DIMMs with the voltage requirement below 1.65V. 2.4.9 VCCIO Voltage [Auto] Allows you to set the VCCIO voltage. Configuration options: [Auto] [+0.10V] 2.4.10 VCCSA Voltage [Auto] Allows you to set the VCCSA voltage. Configuration options: [Auto] [+0.05V] 2.4.11 CPU PLL Voltage [Auto] Allows you to set the CPU and PCH PLL voltage. Configuration options: [Auto] [+0.10V] 2-14 ASUS P8B75-M
-
 1
1 -
2
-
3
-
4
-
5
-
6
-
7
-
8
-
9
-
10
-
11
-
12
-
13
-
14
-
15
-
16
-
17
-
18
-
19
-
20
-
21
-
22
-
23
-
24
-
25
-
26
-
27
-
28
-
29
-
30
-
31
-
32
-
33
-
34
-
35
-
36
-
37
-
38
-
39
-
40
-
41
-
42
-
43
-
44
-
45
-
46
-
47
-
48
-
49
-
50
-
51
-
52
-
 53
53 -
 54
54 -
 55
55 -
 56
56 -
 57
57 -
 58
58 -
 59
59 -
 60
60 -
 61
61 -
 62
62 -
 63
63 -
64
-
65
-
66
-
67
-
68
-
69
-
70
-
71
-
72
-
73
-
74
-
75
-
76
 |
 |