Asus P9X79-E WS User Guide - Page 159
RAID Level, Stripe Size
 |
View all Asus P9X79-E WS manuals
Add to My Manuals
Save this manual to your list of manuals |
Page 159 highlights
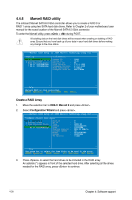
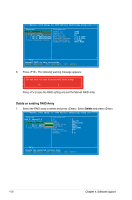
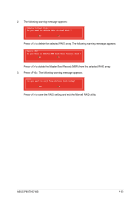
Marvell BIOS Setup (c) 2009 Marvell Technology Group Ltd. Configure->Select free disksCreate Virtual Disk HBA 0: Marvell 0 ├ Virtual Disks └ Free Physical Disks * ├ PD 0: ST3160812AS * └ PD 8: ST3160812AS RAID Level : RAID 0 Max Size(MB) : 305253 Stripe Size : 64KB Quick Init : Yes Name Default Threshold(%) : 90 Next ▶ ▶ Help Virtual disk configurations. ENTER: Select F10: Exit/Save ESC: Return 4. Use the up or down arrow key to move the selection bar and press to configure further RAID settings. RAID Level: Select a RAID Level. Configuration options: [RAID 0] [RAID 10] [RAID1] Stripe Size: Specifies the size of single data block on the virtual disk. In general, a larger stripe size is recommended for applications requiring large data transfers such as audio, video, and graphics. A smaller stripe size is better for applications with content in much smaller size, such as e-mails and documents. Configuration options: [32K] [64K] Name: Enter a name with 1-10 letters (no special characters) for the RAID array. 5. Move the selection bar to Next and press . The following warning message appears: Create Virtual Disk Do you want to create this virtual disk ? Yes No Press to create the RAID array, or press to cancel. The new RAID array appears under Virtual Disks, as shown in the image below. ASUS P9X79-E WS 4-31
-
 1
1 -
2
-
3
-
4
-
5
-
6
-
7
-
8
-
9
-
10
-
11
-
12
-
13
-
14
-
15
-
16
-
17
-
18
-
19
-
20
-
21
-
22
-
23
-
24
-
25
-
26
-
27
-
28
-
29
-
30
-
31
-
32
-
33
-
34
-
35
-
36
-
37
-
38
-
39
-
40
-
41
-
42
-
43
-
44
-
45
-
46
-
47
-
48
-
49
-
50
-
51
-
52
-
53
-
54
-
55
-
56
-
57
-
58
-
59
-
60
-
61
-
62
-
63
-
64
-
65
-
66
-
67
-
68
-
69
-
70
-
71
-
72
-
73
-
74
-
75
-
76
-
77
-
78
-
79
-
80
-
81
-
82
-
83
-
84
-
85
-
86
-
87
-
88
-
89
-
90
-
91
-
92
-
93
-
94
-
95
-
96
-
97
-
98
-
99
-
100
-
101
-
102
-
103
-
104
-
105
-
106
-
107
-
108
-
109
-
110
-
111
-
112
-
113
-
114
-
115
-
116
-
117
-
118
-
119
-
120
-
121
-
122
-
123
-
124
-
125
-
126
-
127
-
128
-
129
-
130
-
131
-
132
-
133
-
134
-
135
-
136
-
137
-
138
-
139
-
140
-
141
-
142
-
143
-
144
-
145
-
146
-
147
-
148
-
149
-
150
-
151
-
152
-
153
-
 154
154 -
 155
155 -
 156
156 -
 157
157 -
 158
158 -
 159
159 -
 160
160 -
 161
161 -
 162
162 -
 163
163 -
 164
164 -
165
-
166
-
167
-
168
-
169
-
170
-
171
-
172
-
173
-
174
-
175
-
176
-
177
-
178
-
179
-
180
 |
 |
