Asus R1F R1F User's Manual for English Edtion(E2541) - Page 16
Left Side - pen
 |
View all Asus R1F manuals
Add to My Manuals
Save this manual to your list of manuals |
Page 16 highlights
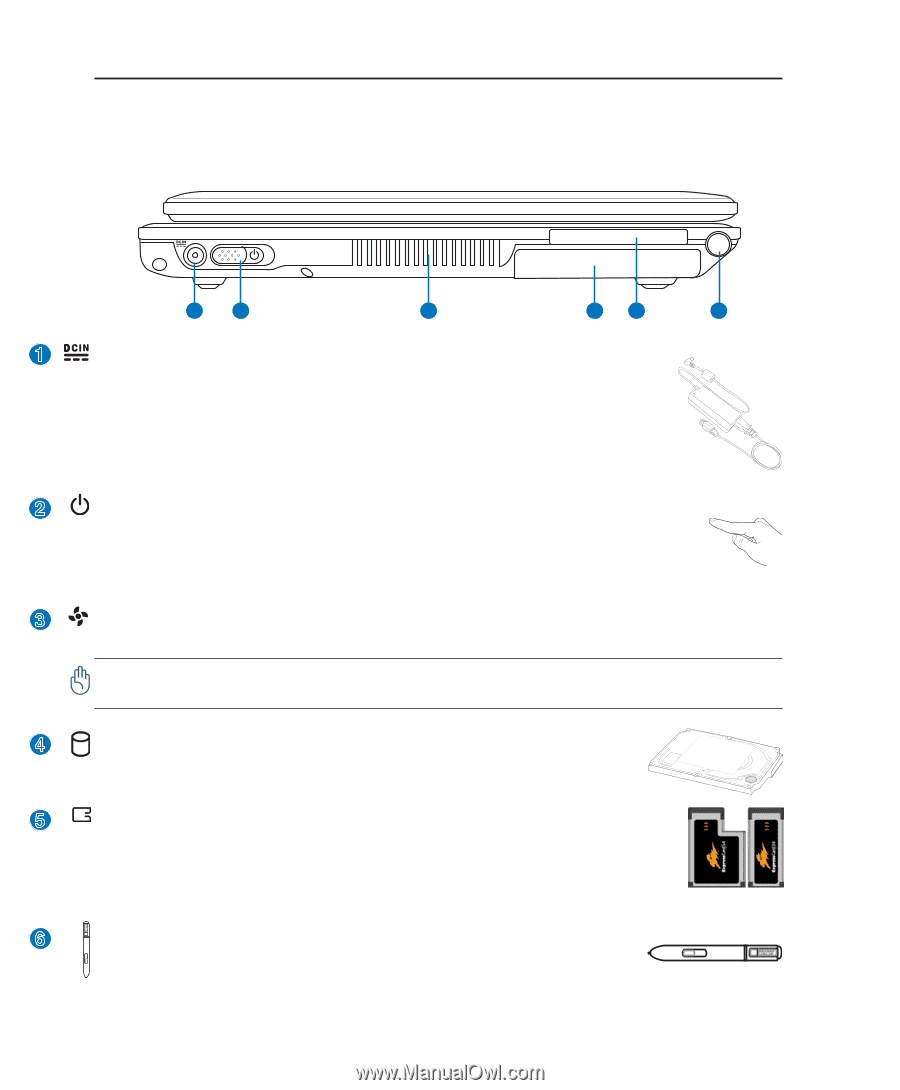
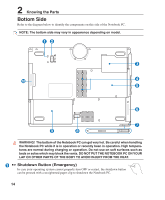
2 Knowing the Parts Left Side Refer to the diagram below to identify the components on this side of the Notebook PC. 12 3 45 6 1 Power (DC) Input The supplied power adapter converts AC power to DC power for use with this jack. Power supplied through this jack supplies power to the Notebook PC and charges the internal battery pack. To prevent damage to the Notebook PC and battery pack, always use the supplied power adapter. CAUTION: MAY BECOME WARM TO HOT WHEN IN USE. BE SURE NOT TO COVER THE ADAPTER AND KEEP IT AWAY FROM YOUR BODY. 2 Power Switch The power switch allows powering ON and OFF the Notebook PC and recovering from STD. Use the switch once to turn ON and once to turn OFF the Notebook PC. In Windows XP, this button can also be used to safely turn OFF the Notebook PC. The power switch only works when the display panel is opened. 3 Air Vents The air vents allow cool air to enter and warm air to exit the Notebook PC. IMPORTANT! Make sure that paper, books, clothing, cables, or other objects do not block any of the air vents or else overheating of the Notebook PC may occur. 4 Hard Disk Drive Compartment The hard disk drive is secured in a compartment. Hard disk drive upgrades are to be done by authorized service centers or dealers only. 5 ExpressCard Slot One 26pin Express card slot is available to support one ExpressCard/34mm or one ExpressCard/54mm expansion card. This new interface is faster by using a serial bus supporting USB 2.0 and PCI Express instead of the slower parallel bus used in the PC card slot. (Not compatible with previous PCMCIA cards.) 6 Touchscreen Pen Compartment The touchscreen pen compartment allows storage of the pen used on the touch- screen panel. 16
-
 1
1 -
2
-
3
-
4
-
5
-
6
-
7
-
8
-
9
-
10
-
 11
11 -
 12
12 -
 13
13 -
 14
14 -
 15
15 -
 16
16 -
 17
17 -
 18
18 -
 19
19 -
 20
20 -
 21
21 -
22
-
23
-
24
-
25
-
26
-
27
-
28
-
29
-
30
-
31
-
32
-
33
-
34
-
35
-
36
-
37
-
38
-
39
-
40
-
41
-
42
-
43
-
44
-
45
-
46
-
47
-
48
-
49
-
50
-
51
-
52
-
53
-
54
-
55
-
56
-
57
-
58
-
59
-
60
-
61
-
62
-
63
-
64
-
65
-
66
-
67
-
68
-
69
-
70
-
71
-
72
-
73
-
74
-
75
-
76
-
77
 |
 |