Asus RAMPAGE V EXTREME U3.1 User Guide - Page 85
Setting up your OC Panel in Normal Mode
 |
View all Asus RAMPAGE V EXTREME U3.1 manuals
Add to My Manuals
Save this manual to your list of manuals |
Page 85 highlights
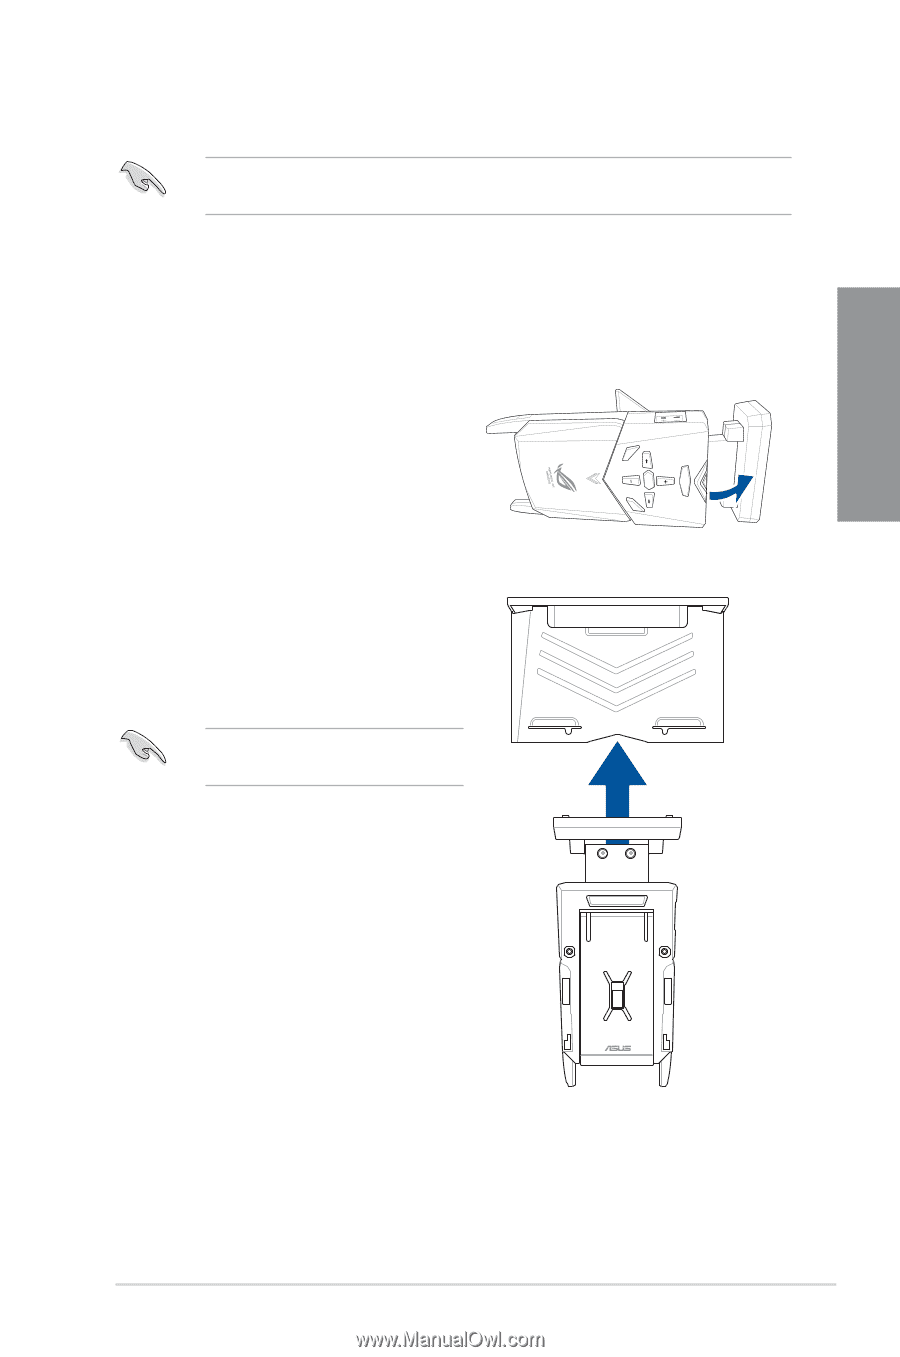
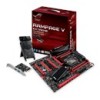
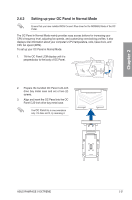
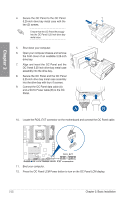
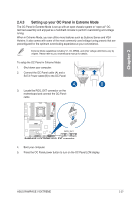
Chapter 2 Start Reset 2.4.2 Setting up your OC Panel in Normal Mode Ensure that you have installed ROG Connect Plus driver for the NORMAL Mode of the OC Panel. The OC Panel in Normal Mode mainly provides easy access buttons for increasing your CPU's frequency level, adjusting fan speeds, and customizing overclocking profiles. It also displays vital information about your computer's CPU temperature, ratio, base clock, and CPU fan speed (RPM). To set up your OC Panel in Normal Mode: 1. Tilt the OC Panel LCM display until it is perpendicular to the body of OC Panel. 2. Prepare the bundled OC Panel 5.25-inch drive bay metal case and set of two (2) screws. 3. Align and insert the OC Panel into the OC Panel 5.25-inch drive bay metal case. The OC Panel fits in one orientation only. If it does not fit, try reversing it. Clear OK Reset ASUS RAMPAGE V EXTREME 2-21
-
 1
1 -
2
-
3
-
4
-
5
-
6
-
7
-
8
-
9
-
10
-
11
-
12
-
13
-
14
-
15
-
16
-
17
-
18
-
19
-
20
-
21
-
22
-
23
-
24
-
25
-
26
-
27
-
28
-
29
-
30
-
31
-
32
-
33
-
34
-
35
-
36
-
37
-
38
-
39
-
40
-
41
-
42
-
43
-
44
-
45
-
46
-
47
-
48
-
49
-
50
-
51
-
52
-
53
-
54
-
55
-
56
-
57
-
58
-
59
-
60
-
61
-
62
-
63
-
64
-
65
-
66
-
67
-
68
-
69
-
70
-
71
-
72
-
73
-
74
-
75
-
76
-
77
-
78
-
79
-
 80
80 -
 81
81 -
 82
82 -
 83
83 -
 84
84 -
 85
85 -
 86
86 -
 87
87 -
 88
88 -
 89
89 -
 90
90 -
91
-
92
-
93
-
94
-
95
-
96
-
97
-
98
-
99
-
100
-
101
-
102
-
103
-
104
-
105
-
106
-
107
-
108
-
109
-
110
-
111
-
112
-
113
-
114
-
115
-
116
-
117
-
118
-
119
-
120
-
121
-
122
-
123
-
124
-
125
-
126
-
127
-
128
-
129
-
130
-
131
-
132
-
133
-
134
-
135
-
136
-
137
-
138
-
139
-
140
-
141
-
142
-
143
-
144
-
145
-
146
-
147
-
148
-
149
-
150
-
151
-
152
-
153
-
154
-
155
-
156
-
157
-
158
-
159
-
160
-
161
-
162
-
163
-
164
-
165
-
166
-
167
-
168
-
169
-
170
-
171
-
172
-
173
-
174
-
175
-
176
-
177
-
178
-
179
-
180
-
181
-
182
-
183
-
184
-
185
-
186
-
187
-
188
-
189
-
190
-
191
-
192
-
193
-
194
-
195
-
196
-
197
-
198
-
199
-
200
-
201
-
202
-
203
-
204
-
205
-
206
-
207
-
208
-
209
-
210
-
211
-
212
-
213
-
214
-
215
-
216
-
217
-
218
-
219
-
220
-
221
-
222
-
223
-
224
-
225
-
226
-
227
-
228
-
229
-
230
 |
 |