Asus ROG CROSSHAIR VII HERO Users Manual English - Page 36
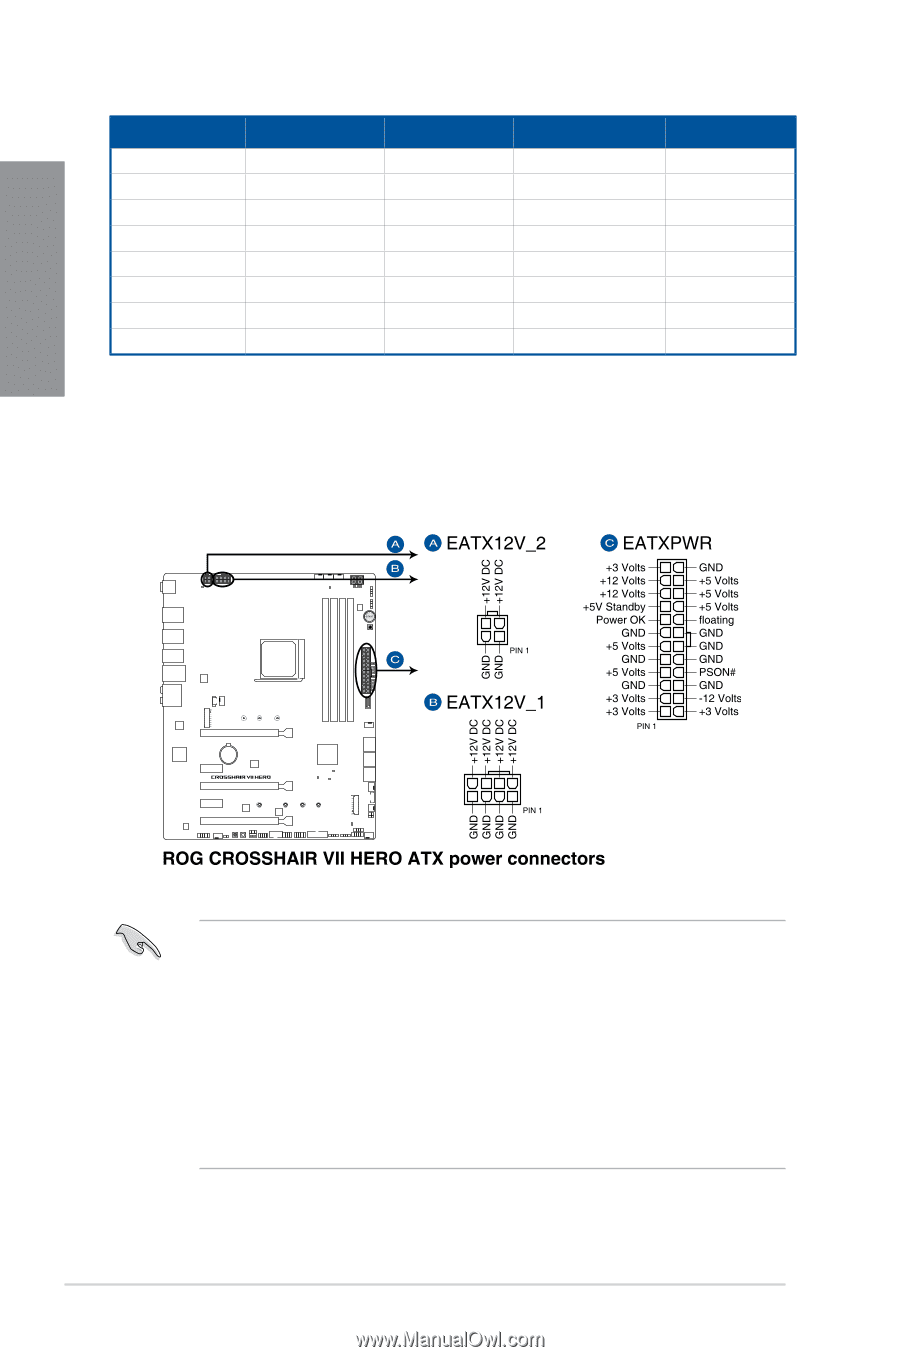
ATX power connectors 24-pin EATXPWR; 8-pin EATX12V_1; 4-pin EATX12V_2, Header, Max. Current
 |
View all Asus ROG CROSSHAIR VII HERO manuals
Add to My Manuals
Save this manual to your list of manuals |
Page 36 highlights
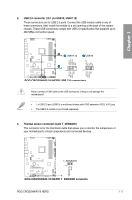
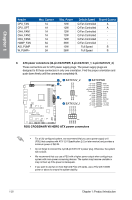
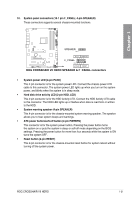
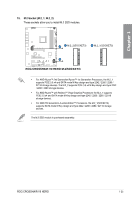
Chapter 1 Header CPU_FAN CPU_OPT CHA_FAN1 CHA_FAN2 CHA_FAN3 HAMP_FAN AIO_PUMP W_PUMP+ Max. Current 1A 1A 1A 1A 1A 3A 1A 3A Max. Power 12W 12W 12W 12W 12W 36W 12W 36W Default Speed Q-Fan Controlled Q-Fan Controlled Q-Fan Controlled Q-Fan Controlled Q-Fan Controlled Q-Fan Controlled Full Speed Full Speed Shared Control A A B B 9. ATX power connectors (24-pin EATXPWR; 8-pin EATX12V_1; 4-pin EATX12V_2) These connectors are for ATX power supply plugs. The power supply plugs are designed to fit these connectors in only one orientation. Find the proper orientation and push down firmly until the connectors completely fit. • For a fully configured system, we recommend that you use a power supply unit (PSU) that complies with ATX 12 V Specification 2.0 (or later version) and provides a minimum power of 350 W. • Do not forget to connect the 4-pin/8-pin EATX12 V power plug. Otherwise, the system will not boot. • We recommend that you use a PSU with a higher power output when configuring a system with more power-consuming devices. The system may become unstable or may not boot up if the power is inadequate. • If you want to use two or more high-end PCIe x16 cards, use a PSU with 1000W power or above to ensure the system stability. 1-20 Chapter 1: Product Introduction
-
 1
1 -
2
-
3
-
4
-
5
-
6
-
7
-
8
-
9
-
10
-
11
-
12
-
13
-
14
-
15
-
16
-
17
-
18
-
19
-
20
-
21
-
22
-
23
-
24
-
25
-
26
-
27
-
28
-
29
-
30
-
 31
31 -
 32
32 -
 33
33 -
 34
34 -
 35
35 -
 36
36 -
 37
37 -
 38
38 -
 39
39 -
 40
40 -
 41
41 -
42
-
43
-
44
-
45
-
46
-
47
-
48
-
49
-
50
-
51
-
52
-
53
-
54
-
55
-
56
-
57
-
58
-
59
-
60
-
61
-
62
-
63
-
64
-
65
-
66
-
67
-
68
-
69
-
70
-
71
-
72
-
73
-
74
-
75
-
76
-
77
-
78
-
79
-
80
-
81
-
82
-
83
-
84
-
85
-
86
-
87
-
88
-
89
-
90
-
91
-
92
-
93
-
94
-
95
-
96
-
97
-
98
-
99
-
100
-
101
-
102
 |
 |