Asus RS100-X5 User Manual - Page 34
Serial ATA signal connector to
 |
UPC - 610839660971
View all Asus RS100-X5 manuals
Add to My Manuals
Save this manual to your list of manuals |
Page 34 highlights
5. Secure the hard drive with four screws. 6. Connect the other end of the Serial ATA signal connector to the onboard SATA connector labeled SATA2. Refer to illustration for the location of SATA2 connector. SATA1 SASTAAT2A1 SATA2 P5GC-MR.SPA5TGAC.C-oMnRn.eScAtToArs.Connectors P5GC-MR R P5GC-MR R GND RSATA_RXP1 RSATA_RXN1 GND RSATA_TXN1 RSATA_TXP1 GND GND RSATA_RXP2 RGSNRGADSNTADAT_AR_XRNX2P1 RRSSRGAASNTTADAAT__ATT_XXRPNX22N1 GNRRDSSAATTAA__TTXXPN11 GND GND RSATA_RXP2 RSATA_RXN2 GND RSATA_TXN2 RSATA_TXP2 GND 2-16 Chapter 2: Hardware setup
-
 1
1 -
2
-
3
-
4
-
5
-
6
-
7
-
8
-
9
-
10
-
11
-
12
-
13
-
14
-
15
-
16
-
17
-
18
-
19
-
20
-
21
-
22
-
23
-
24
-
25
-
26
-
27
-
28
-
 29
29 -
 30
30 -
 31
31 -
 32
32 -
 33
33 -
 34
34 -
 35
35 -
 36
36 -
 37
37 -
 38
38 -
 39
39 -
40
-
41
-
42
-
43
-
44
-
45
-
46
-
47
-
48
-
49
-
50
-
51
-
52
-
53
-
54
-
55
-
56
-
57
-
58
-
59
-
60
-
61
-
62
-
63
-
64
-
65
-
66
-
67
-
68
-
69
-
70
-
71
-
72
-
73
-
74
-
75
-
76
-
77
-
78
-
79
-
80
-
81
-
82
-
83
-
84
-
85
-
86
-
87
-
88
-
89
-
90
-
91
-
92
-
93
-
94
-
95
-
96
-
97
-
98
 |
 |

Chapter 2:
Hardware setup
±-1µ
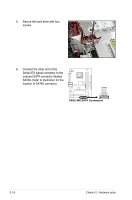
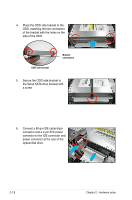
5.
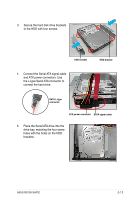
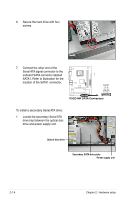
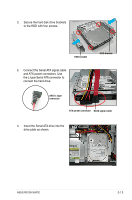
Secure the hard drive with four
screws.
6.
Connect the other end of the
Serial ATA signal connector to the
onboard SATA connector labeled
SATA2. Refer to illustration for the
location of SATA2 connector.
P5GC-MR
P5GC-MR SATA Connectors
GND
RSATA_TXP2
RSATA_TXN2
GND
RSATA_RXN2
RSATA_RXP2
GND
SATA2