Asus RS160-E3 PS4 RS160-E3 - Page 39
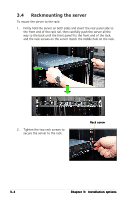
Use a Phillips screwdriver cross
 |
View all Asus RS160-E3 PS4 manuals
Add to My Manuals
Save this manual to your list of manuals |
Page 39 highlights
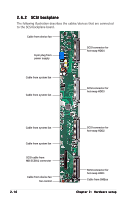
5. Use a Phillips screwdriver (cross) to remove the screw that secures the drive. 6. Carefully slide the optical drive inward for about half an inch, then lift it out of the bay. 7. Remove the screws that secure the optical drive to its metal bracket. ASUS RS160-E3/PS4 2-21
-
 1
1 -
2
-
3
-
4
-
5
-
6
-
7
-
8
-
9
-
10
-
11
-
12
-
13
-
14
-
15
-
16
-
17
-
18
-
19
-
20
-
21
-
22
-
23
-
24
-
25
-
26
-
27
-
28
-
29
-
30
-
31
-
32
-
33
-
 34
34 -
 35
35 -
 36
36 -
 37
37 -
 38
38 -
 39
39 -
 40
40 -
 41
41 -
 42
42 -
 43
43 -
 44
44 -
45
-
46
-
47
-
48
-
49
-
50
-
51
-
52
-
53
-
54
-
55
-
56
-
57
-
58
-
59
-
60
-
61
-
62
-
63
-
64
-
65
-
66
-
67
-
68
-
69
-
70
-
71
-
72
-
73
-
74
-
75
-
76
-
77
-
78
-
79
-
80
-
81
-
82
-
83
-
84
-
85
-
86
-
87
-
88
-
89
-
90
-
91
-
92
-
93
-
94
-
95
-
96
-
97
-
98
-
99
-
100
-
101
-
102
-
103
-
104
-
105
-
106
-
107
-
108
-
109
-
110
-
111
-
112
-
113
-
114
-
115
-
116
-
117
-
118
-
119
-
120
-
121
-
122
-
123
-
124
-
125
-
126
-
127
-
128
-
129
-
130
-
131
-
132
-
133
-
134
-
135
-
136
-
137
-
138
-
139
-
140
 |
 |

2-21
2-21
2-21
2-21
2-21
ASUS RS160-E3/PS4
ASUS RS160-E3/PS4
ASUS RS160-E3/PS4
ASUS RS160-E3/PS4
ASUS RS160-E3/PS4
6.
Carefully slide the optical drive
inward for about half an inch, then
lift it out of the bay.
7.
Remove the screws that secure
the optical drive to its metal
bracket.
5.
Use a Phillips screwdriver (cross)
to remove the screw that secures
the drive.