Asus RS726Q-E7 RS12 RS72xQ-E7_RS12 User Manual - Page 35
ASUS RS720Q-E7/RS12, RS724Q-E7/RS12, RS726Q-E7/RS12, When installed, the SATAII/SAS connector on
 |
View all Asus RS726Q-E7 RS12 manuals
Add to My Manuals
Save this manual to your list of manuals |
Page 35 highlights
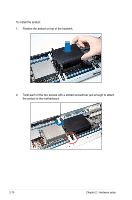
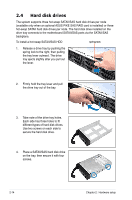
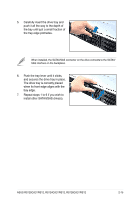
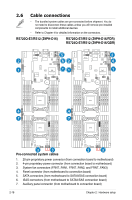
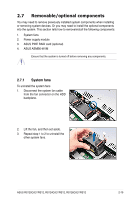
5. Carefully insert the drive tray and push it all the way to the depth of the bay until just a small fraction of the tray edge protrudes. When installed, the SATAII/SAS connector on the drive connects to the SATAII/ SAS interface on the backplane. 6. Push the tray lever until it clicks, and secures the drive tray in place. The drive tray is correctly placed when its front edge aligns with the bay edge. 7. Repeat steps 1 to 6 if you wish to install other SATAII/SAS drive(s). ASUS RS720Q-E7/RS12, RS724Q-E7/RS12, RS726Q-E7/RS12 2-15
-
 1
1 -
2
-
3
-
4
-
5
-
6
-
7
-
8
-
9
-
10
-
11
-
12
-
13
-
14
-
15
-
16
-
17
-
18
-
19
-
20
-
21
-
22
-
23
-
24
-
25
-
26
-
27
-
28
-
29
-
 30
30 -
 31
31 -
 32
32 -
 33
33 -
 34
34 -
 35
35 -
 36
36 -
 37
37 -
 38
38 -
 39
39 -
 40
40 -
41
-
42
-
43
-
44
-
45
-
46
-
47
-
48
-
49
-
50
-
51
-
52
-
53
-
54
-
55
-
56
-
57
-
58
-
59
-
60
-
61
-
62
-
63
-
64
-
65
-
66
-
67
-
68
-
69
-
70
-
71
-
72
-
73
-
74
-
75
-
76
-
77
-
78
-
79
-
80
-
81
-
82
-
83
-
84
-
85
-
86
-
87
-
88
-
89
-
90
-
91
-
92
-
93
-
94
-
95
-
96
-
97
-
98
-
99
-
100
-
101
-
102
-
103
-
104
-
105
-
106
-
107
-
108
-
109
-
110
-
111
-
112
-
113
-
114
-
115
-
116
-
117
-
118
-
119
-
120
-
121
-
122
-
123
-
124
-
125
-
126
-
127
-
128
-
129
-
130
-
131
-
132
-
133
-
134
-
135
-
136
-
137
-
138
-
139
-
140
-
141
-
142
-
143
-
144
-
145
-
146
-
147
-
148
-
149
-
150
-
151
-
152
-
153
-
154
-
155
-
156
-
157
-
158
-
159
-
160
-
161
-
162
-
163
-
164
-
165
-
166
-
167
-
168
-
169
-
170
-
171
-
172
-
173
-
174
-
175
-
176
-
177
-
178
-
179
-
180
-
181
-
182
-
183
-
184
-
185
-
186
-
187
-
188
-
189
-
190
-
191
-
192
-
193
-
194
-
195
-
196
 |
 |
2-15
ASUS RS720Q-E7/RS12, RS724Q-E7/RS12, RS726Q-E7/RS12
5.
Carefully insert the drive tray and
push it all the way to the depth of
the bay until just a small fraction of
the tray edge protrudes.
6.
Push the tray lever until it clicks,
and secures the drive tray in place.
The drive tray is correctly placed
when its front edge aligns with the
bay edge.
7.
Repeat steps 1 to 6 if you wish to
install other SATAII/SAS drive(s).
When installed, the SATAII/SAS connector on the drive connects to the SATAII/
SAS interface on the backplane.