Asus TS100-E3 PI2 User Guide - Page 39
Hard disk drives
 |
View all Asus TS100-E3 PI2 manuals
Add to My Manuals
Save this manual to your list of manuals |
Page 39 highlights
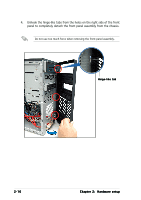
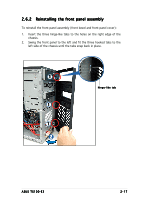
2.8 Hard disk drives 2.8.1 Removing a SATA HDD Follow the instructions in this section to remove a SATA hard disk drive (HDD). 1. First remove both side covers. 2. Then, unplug the SATA signal and power cables. 3. Unscrew the SATA HDD. 4. Remove the SATA HDD from the bay. ASUS TS100-E3 2-21
-
 1
1 -
2
-
3
-
4
-
5
-
6
-
7
-
8
-
9
-
10
-
11
-
12
-
13
-
14
-
15
-
16
-
17
-
18
-
19
-
20
-
21
-
22
-
23
-
24
-
25
-
26
-
27
-
28
-
29
-
30
-
31
-
32
-
33
-
 34
34 -
 35
35 -
 36
36 -
 37
37 -
 38
38 -
 39
39 -
 40
40 -
 41
41 -
 42
42 -
 43
43 -
 44
44 -
45
-
46
-
47
-
48
-
49
-
50
-
51
-
52
-
53
-
54
-
55
-
56
-
57
-
58
-
59
-
60
-
61
-
62
-
63
-
64
-
65
-
66
-
67
-
68
-
69
-
70
-
71
-
72
-
73
-
74
-
75
-
76
-
77
-
78
-
79
-
80
-
81
-
82
-
83
-
84
-
85
-
86
-
87
-
88
-
89
-
90
-
91
-
92
-
93
-
94
-
95
-
96
-
97
-
98
-
99
-
100
-
101
-
102
-
103
-
104
-
105
-
106
-
107
-
108
-
109
-
110
-
111
-
112
-
113
-
114
-
115
-
116
-
117
-
118
-
119
-
120
-
121
-
122
-
123
-
124
-
125
-
126
-
127
-
128
-
129
-
130
-
131
-
132
-
133
-
134
-
135
-
136
-
137
-
138
-
139
-
140
-
141
-
142
-
143
-
144
-
145
-
146
-
147
-
148
-
149
-
150
-
151
-
152
 |
 |

2-21
2-21
2-21
2-21
2-21
ASUS TS100-E3
ASUS TS100-E3
ASUS TS100-E3
ASUS TS100-E3
ASUS TS100-E3
2.8
Hard disk drives
2.8.1
2.8.1
2.8.1
2.8.1
2.8.1
Removing a SATA HDD
Removing a SATA HDD
Removing a SATA HDD
Removing a SATA HDD
Removing a SATA HDD
Follow the instructions in this section to remove a SATA hard disk drive (HDD).
1.
First remove both side covers.
2.
Then, unplug the SATA signal and
power cables.
3.
Unscrew the SATA HDD.
4.
Remove the SATA HDD from the
bay.