Asus Tinker Board E15215TinkerBoardSeriesEMWEB - Page 5
Getting Started - android
 |
View all Asus Tinker Board manuals
Add to My Manuals
Save this manual to your list of manuals |
Page 5 highlights
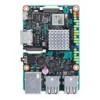
2. Getting Started Before setting up Tinker Board, please download an operating system image such as the Official ASUS Tinker OS, an Android OS, or other supported OS'. • To download the Official ASUS Tinker OS, please visit https://www.asus.com/Single-BoardComputer/Tinker-Board/HelpDesk_Download/. • For more information on other supported OS', please visit the Software section of the Tinker board Wiki. If you are using a Tinker Board and not the Tinker Board S, please ignore the sections related to eMMC. 2.1 Setting up using eMMC (Tinker Board S only) The UMS (USB Mass Storage) allows you to simulate the eMMC of the Tinker Board S as a recognizable device in Windows® and Linux. It is enabled automatically during the U-Boot when it detects that the Tinker Board S is connected to a PC. Please refer to the steps below to set up your Tinker Board OS using the onboard eMMC: • Ensure to use the latest version of your downloaded OS to ensure the OS is supported by eMMC storage. • Ensure the eMMC's U-Boot is functional, and contains a built-in UMS function. 1. Connect your Tinker Board S to a PC using a Micro USB cable, then wait for the PC to recognize the device. • DO NOT format the device while your Tinker Board S is connected to your PC. • If your PC doesn't recognize the device, please refer to the OS Write Recovery section of this manual. 2. Write the downloaded OS image to the Tinker Board S using a third-party ISO software, such as Etcher or Win32DiskImager. You may refer to the Writing the OS image section of this manual for more information on writing the OS image. • Etcher is supported on Windows®, Mac, and Linux. • Please refer to http://etcher.io/ for more information on Etcher. • Please refer to http://sourceforge.net for more information on Win32DiskImager. 3. Once the image has been successfully written, connect your Tinker Board S to a power source using the bundled adapter to boot your Tinker Board S. 5
-
 1
1 -
 2
2 -
 3
3 -
 4
4 -
 5
5 -
 6
6 -
 7
7 -
 8
8 -
 9
9 -
 10
10 -
 11
11 -
12
 |
 |
