Asus VINTAGE-AH1 Vintage-AH1 User's Manual for English Edtion - Page 21
Removing the side plates and, front cover
 |
View all Asus VINTAGE-AH1 manuals
Add to My Manuals
Save this manual to your list of manuals |
Page 21 highlights
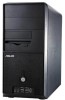
2.3 Removing the side plates and front cover The system has two chassis side plates, each one secured by two screws located on the rear panel. To remove the chassis side plate: 1. Turn each screw counterclockwise to release the side cover. Set the screws aside. 2. Slide the side panel for about half an inch toward the rear until it disengages from the chassis. Steel railing Hinge-like tab 6 1 4 2 6 4 1 6 4 5 Side lock tab 3. Repeat steps 1 and 2 to remove the other side plate cover. 4. Release the side lock tabs from the steel railing. 5. Swing the left edge of the front panel outward. 6. Unhook the hinge-like tabs from the holes on the right side of the front panel to completely detach the front panel assembly from the chassis. ASUS Vintage-AH1 2-3
-
 1
1 -
2
-
3
-
4
-
5
-
6
-
7
-
8
-
9
-
10
-
11
-
12
-
13
-
14
-
15
-
 16
16 -
 17
17 -
 18
18 -
 19
19 -
 20
20 -
 21
21 -
 22
22 -
 23
23 -
 24
24 -
 25
25 -
 26
26 -
27
-
28
-
29
-
30
-
31
-
32
-
33
-
34
-
35
-
36
-
37
-
38
-
39
-
40
-
41
-
42
-
43
-
44
-
45
-
46
-
47
-
48
-
49
-
50
-
51
-
52
-
53
-
54
-
55
-
56
-
57
-
58
-
59
-
60
-
61
-
62
-
63
-
64
-
65
-
66
-
67
-
68
-
69
-
70
-
71
-
72
-
73
-
74
-
75
-
76
-
77
-
78
-
79
-
80
-
81
-
82
-
83
-
84
-
85
-
86
-
87
-
88
-
89
-
90
-
91
-
92
-
93
-
94
-
95
-
96
-
97
-
98
-
99
-
100
-
101
-
102
-
103
-
104
-
105
-
106
-
107
-
108
-
109
-
110
-
111
-
112
-
113
 |
 |
