Asus Xonar DGX Xonar DGX User's Manual - Page 38
Description, Left/Right balance, Recording volume, slider, Recording Selector, button, Advanced - microphone
 |
View all Asus Xonar DGX manuals
Add to My Manuals
Save this manual to your list of manuals |
Page 38 highlights
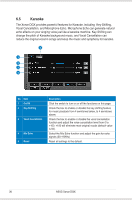
6.3.2 Recording/Monitoring Volume 1 8 2 3 4 5 6 7 No Item Description 1 Recording Volume Tab Click this button to show the recording volume page. 2 Left/Right balance The horizontal slider controls the volume between the left and right channels. 3 Recording volume slider Drag this slider down to decrease the recording volume; drag up to increase the recording volume. The tool-tip reveals the percentage number from 1 to 100 in terms of the full scale level. 4 Recording Selector button Click this button to select the path/source you are going to record. Note that the recording function on Windows is a one-path selector. So, you can select only one default recording source at a time. You may have to restart the recorder program if you switch to a different source. (Note: On Vista, some application programs may allow you to select the recording device/path in the recording programs themselves.) 5 Microphone-In Advanced Setting Click this button to open the advanced settings for the Microphone-In: Enabling "Microphone Boost" will increase a volume gain to boost microphone input signals. For typical low-cost PC microphone, it's recommended to enable this function. You can check with "Front Mic" to enable microphone of front panel. (continued on the next page) 32 ASUS Xonar DGX
-
 1
1 -
2
-
3
-
4
-
5
-
6
-
7
-
8
-
9
-
10
-
11
-
12
-
13
-
14
-
15
-
16
-
17
-
18
-
19
-
20
-
21
-
22
-
23
-
24
-
25
-
26
-
27
-
28
-
29
-
30
-
31
-
32
-
 33
33 -
 34
34 -
 35
35 -
 36
36 -
 37
37 -
 38
38 -
 39
39 -
 40
40 -
 41
41 -
 42
42 -
 43
43 -
44
-
45
-
46
-
47
-
48
-
49
-
50
-
51
-
52
-
53
-
54
-
55
-
56
-
57
-
58
 |
 |
