Audiovox AVXMTG9B User Manual - Page 14
Settings And Adjustments, Main Menu, Loading And Playing Discs
 |
View all Audiovox AVXMTG9B manuals
Add to My Manuals
Save this manual to your list of manuals |
Page 14 highlights
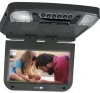
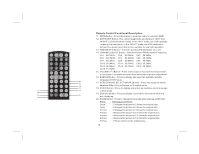
LOADING AND PLAYING DISCS 1. Press the Screen Release (PRESS) button to unlock the LCD screen. The LCD screen will drop down slightly. 2. Pivot the screen downward until a conformable viewing angle is reached. The hinge friction will hold the screen in position while the unit is in use. 3. Press the power ( ) button on the unit or remote control to turn the unit on. 4. Insert a disc into the disc insertion slot with the label facing up towards the headliner. Note: The unit will turn on automatically when a disc is inserted. 5. After the unit has been turned on and is displaying a picture, adjust the viewing angle. Pivot the screen to optimize the picture quality. 6. Remember to turn the unit off and pivot the screen to the locked position when not in use. SETTINGS AND ADJUSTMENTS The setup menu contains features and options that let you customize your DVD player. For example, you can set a language for the On Screen Display (OSD) or control DVD playback content for children. Main Menu 1. Press the "SETUP" button. The Main Menu will be displayed on the screen. 2. Press the " " or " " button to highlight the General, Preference or Password setup pages. 3. Press the "OK" button to access the selected page. 4. Press the " " or " " CURSOR button to select a menu item. 5. Press the " " CURSOR button to enter the option submenu. 6. Press the " " or " " CURSOR button to select an option. 7. Press the "OK" button to confirm your selection. 8. Press the " " button to return to the Main Menu or the "SETUP" button to exit. 12
-
 1
1 -
2
-
3
-
4
-
5
-
6
-
7
-
8
-
 9
9 -
 10
10 -
 11
11 -
 12
12 -
 13
13 -
 14
14 -
 15
15 -
 16
16 -
 17
17 -
 18
18 -
 19
19 -
20
-
21
-
22
-
23
-
24
-
25
-
26
-
27
-
28
 |
 |
