Audiovox AVXMTG9B User Manual - Page 6
Front View
 |
View all Audiovox AVXMTG9B manuals
Add to My Manuals
Save this manual to your list of manuals |
Page 6 highlights
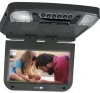
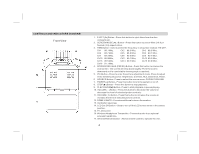
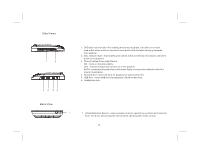
CONTROLS AND INDICATORS DIAGRAM Front View 1. EJECT( ) Button - Press this button to eject discs from the disc compartment. 2. SCREEN MODE ( ) Button - Press this button to select Wide (16:9) or Normal (4:3) aspect ratios. 3. FMM Button - Used to select the frequency in sequence rotation: FM OFF, Ch1 88.1 Mhz, Ch2 88.3 Mhz, Ch3 88.5 Mhz, Ch4 88.7 Mhz, Ch5 88.9 Mhz, Ch6 89.1 Mhz, Ch7 89.3 Mhz, Ch8 89.5 Mhz, Ch9 89.7 Mhz, Ch10 89.9MHz, Ch11 90.1 Mhz, Ch12 90.3 Mhz, Ch13 90.5 Mhz, Ch14 90.7 Mhz, Ch15 90.9 Mhz, Ch16 91.1 Mhz. 4. SCREEN RELEASE (PRESS) Button - Press this button to release the LCD screen. The screen will drop down slightly. Pivot the screen downward until a comfortable viewing angle is reached. 5. PIC Button - Press to enter the picture adjustment mode. Press to adjust in the following sequence: Brightness, Contrast, Hue, Saturation, Reset. 6 SOURCE Button - Press to select the source menu: DVD/AV1/SD/USB. 7. POWER( ) Button - Press this button to turn the system on or off. 8. STOP( ) Button - Press this button to stop playback. 9. PLAY/PAUSE( ) Button - Press to start playback or pause playing. 10. VOLUME ( - ) Button - Press this button to decrease the volume or decrease the level of selected picture controls. 11. VOLUME ( + ) Button - Press this button to increase the volume or increase the level of selected picture controls. 12. DOME LIGHTS - Provides additional interior illumination. 13. Ventilation openings 14. LCD Cut Off Switch - Used to turn off the LCD screen when in the closed position. 15. 9" LCD screen 16. Wireless Headphone Transmitter - Transmits audio to an optional wireless headphone. 17. Infrared Remote Sensor - Allows remote control to operate the unit. 4
-
 1
1 -
 2
2 -
 3
3 -
 4
4 -
 5
5 -
 6
6 -
 7
7 -
 8
8 -
 9
9 -
 10
10 -
 11
11 -
 12
12 -
13
-
14
-
15
-
16
-
17
-
18
-
19
-
20
-
21
-
22
-
23
-
24
-
25
-
26
-
27
-
28
 |
 |
