Audiovox HTB80 Safety Guide - Page 4
HTBaO - replacement remote
 |
UPC - 044476049217
View all Audiovox HTB80 manuals
Add to My Manuals
Save this manual to your list of manuals |
Page 4 highlights
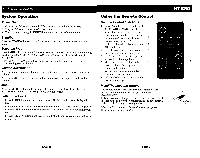
L/fcollslic ~s(1arch, System Operation Power On 1. Connect the DC adapter to the DC IN connector on the back of the unit. 2. Plug the DC adapter into an AC power outlet. 3. Tum the unit on using the POWER switch on the back of the main unit. Standby Press the STANDY button on the front panel or remote control to enter "Standby" mode. . Selecting Input Press the INPUT button on the front panel to access sources connected to the following auxiliary inputs: AUX1, AUX2, or AUX3. (see "Back Panel Controls/Connections" on page 5). Press the AUX1, AUX2, or AUX3 button on the remote control to access the corresponding source directly. Volume Adjustment Press the VOL - or VOL + button on the front panel or remote control to adjust the volume. Press the SUB - or SUB + button on the remote control to adjust the subwoofer volume. Mute Press the MUTE button on the front panel or remote control to silence the volume. Press MUTE again to resume the previous volume setting. Setting the Clock 1. Press the SET button on the remote control. The hour in the clock display will flash. 2. Press the ... or ... button on the remote control until the correct hour is displayed. 3. Press the SET button on the remote control. The minutes on the clock display will flash. 4. Press the ... or ... button on the remote control until the desired minute setting is displayed. Using the Remote Control Remote Control Functions 1. Power/Standby: Tum the unit on/off 2. AUX1, AUX2, AUX3: Press to access the source connected to the corresponding inputs on the back of the unit (see "Back Panel Controls/ 2 Connections" on page 5). 3. EFFECT: Press to enable/disable the 3 3D sound effect. 4. SET: Press to set the clock hours. 4 Press again to set the clock minutes. 5. SUB + / SUB -: Press to adjust the subwoofer volume up/down. 6. Mute: Press to mute (silence) the 5 master volume. Press again to resume audio output. 7 Press after using the SET button to adjust the time. 8. VOL + / VOL -: Press to adjust the master volume up/down. Install/Replace the Battery The remote control uses a pre-installed lithium battery. Before using the remote control, pull to remove the insulating strip. If the remote control begins to fail, replace the battery with another of the same type. When installing the new battery, make sure the "+" sign is facing upward. NOTE: Please discard the used battery properly. Do not place in or near fire. HTBaO 6 7 8 page 6 page 7
-
 1
1 -
 2
2 -
 3
3 -
 4
4 -
 5
5 -
 6
6
 |
 |
