Audiovox VOH1042DL Owners Manual - Page 7
Remote Controlled Tv Functions
 |
UPC - 044476007095
View all Audiovox VOH1042DL manuals
Add to My Manuals
Save this manual to your list of manuals |
Page 7 highlights
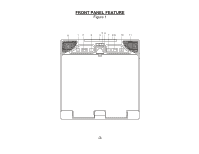
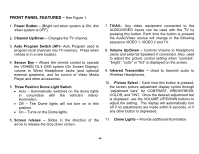
REMOTE CONTROLLED TV FUNCTIONS 1. POWER ON/OFF Press this button to turn the VOH1042 DL on. The channel number or current video source will be displayed on screen, and the picture will appear in a few seconds. Press the button again to turn the VOH1042 DL off. 2. DIRECT ACCESS (0-9) BUTTONS Use these buttons to make a direct channel selection. The channel number chosen will be displayed on the screen for about 4 seconds. The direct access is carried out with 0-9 keys (0-99CH). The "1__" key will not function as it is only used for cable channels above 99. 3. CHANNEL UP/DOWN BUTTONS Use these buttons to advance to the next higher or lower channel. See also: SKIP/SEARCH BUTTON. 4. VOLUME UP/DOWN BUTTONS Use these buttons to raise or lower the volume level of the Wired Headphones or External Speakers if installed. They are also used to make adjustments in the picture select mode. NOTE: These buttons will not affect the volume of wireless headphones or a wired RF modulator. When using these devices the volume must be adjusted with the headphone volume control or with your radio's volume control. (See page 10, Headphones, or page 11, Wired FM Modulator). 5. PICTURE SELECT BUTTON Each time this button is pressed, the screen picture adjustment display cycles through "adjustment bars" for CONTRAST, BRIGHTNESS, COLOR, and TINT. Once the desired adjustment bar is displayed, use the VOLUME UP/DOWN buttons to adjust the setting. The display will automatically turn off if no adjustments are made within 6 seconds, or if any other button is depressed. 6. MUTE BUTTON Press this button to shut off the sound to the Wired Headphones and External Speakers if installed. The screen will display the volume adjustment bar for 6 seconds, indicating that the sound has been turned off. Pressing the button again restores sound to the previously set level. The mute feature may also be released by pressing the VOLUME UP/DOWN buttons. 7. TV / VIDEO BUTTON Any video equipment connected to the AUDIO/VIDEO inputs can be used with the TV by pressing this button. Each time the button is pressed, the Audio/Video source will change in the following sequence VIDEO1, VIDEO2, and TV. -6-
-
 1
1 -
 2
2 -
 3
3 -
 4
4 -
 5
5 -
 6
6 -
 7
7 -
 8
8 -
 9
9 -
 10
10 -
 11
11 -
 12
12 -
13
-
14
-
15
-
16
 |
 |